How to Add a Google Form to Your WordPress Site
You probably use Google Docs, Sheet, and Drive all the time, but did you know about Google Forms?
This lesser-known service offers a simple way to create beautiful-looking online forms within a short period. These forms can be accessed directly, shared on social media, or displayed on a website.
In today’s post, I am going to show you how to create a Google Form and display it on your WordPress site.
But first, let me clear a confusion some of you might have – why should we use Google Form while we can use a contact form plugin on our website? That doesn’t make any sense, right?
Why Use a Google Form?
Well, there are some valid reasons why you should use Google Form instead of using a contact form on your site.
For instance, if you need to show the same form on multiple sites, you can create it once on Google Forms, and show it on as many sites as you want. This makes it very easy to make changes to your Google Form and have the changes applied to all the sites.
The same concept is also applicable if you want to save the email list, run a poll, and so on. What’s more, you can add collaborators to help you with the data that will be saved on Google Drive.
How to Create a Google Form?
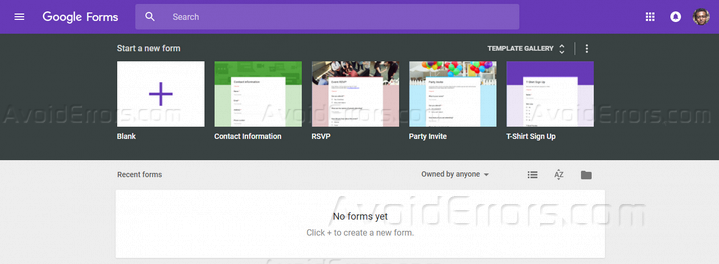
The first step is to visit the Google Forms page. You will find some basic templates for creating contact, RSVP, party invitation forms, and so on. Tap the “Template Gallery” button to explore more templates. It is also possible to create a blank form without any styling.
You can choose any template or get started from scratch. There are dedicated fields to provide the form name and description followed by the form fields. It is possible to add different types of fields including multiple choice, checkbox, dropdown, short answer, paragraph, date, time, etc.

For each field, you will find dedicated options to delete, duplicate, or mark it as required. You can easily rearrange the fields by dragging and dropping them inside the form.

It is possible to choose a custom color or image as the background for your form. To do that, click the “Color Palette” icon on the top-right menu. You can choose any of the existing background colors, images, or upload your own image.
There is a preview button at the top to let you find out how the form will look like to a regular visitor.
Embedding the Google Form in Your WordPress site
It is very easy to embed a Google Form on your WordPress site. Once you have finished configuring your form, click the “Send” button located at the top-right corner of the screen. It will open a pop-up containing three options to send the form – email, link, and embed.
Click the embed tab to generate the embed text for the form. You can customize the width and height of the form according to your requirement. Copy the HTML embed code.

Get back to your WordPress site and open the post/page where you want to show the Google form. Go to the text mode and paste the embed code you copied from the send option. Publish the post/page, and you will find the Google Form embedded in that content.
Using a Plugin to Show a Google Form in Your Website
If you don’t like the default Google styles and want more control over the form, you need to use a plugin like Google Forms. Once you install and activate the plugin on your site, you will notice a new menu item titled “Google Forms.”
Click on the menu item, and then click the “Add New Google Form” button. This takes you to a page like the following –

As the page is divided into several sections, let’s check out the necessary sections quickly.
Google Form Details
In the “Form URL” field, you have to provide the form URL. To find out the URL, get back to the form, and click the “Send” button. The second tab will provide you with the link. Copy the link and paste it into the form URL field.
The next two options enable you to add a confirm page URL and the style for that page. Other options will let you customize the alert message upon submission, add a CSS class, enable the notification email, define recipient email address, apply custom CSS styles, and manage the form cache.
Google Form Default Text Overrides

As you can guess from the section name, it allows you to override the default text from Google Forms. You will find separate fields to provide replacement text for the submit, back, continue buttons, required text, check boxes, and so on.
Google Form Options
This section contains several options to enable Captcha, define the number of columns for the form, minimum width for a column, etc. You will also find options to send an email notification to the user, show the legal disclaimer, original form title from Google Forms. There are two dedicated options to add a custom suffix or prefix to the Google CSS classes.
Once you configured the options for your form, click “Publish.” This will add the form to your site. Now you have to display it by using the following steps.
Displaying the Form with the Plugin
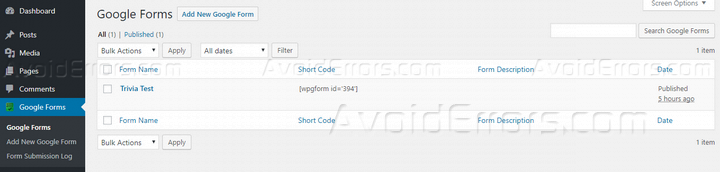
Click on the “Google Forms” menu on your dashboard. This will take you to a page containing all the Google Forms you have added so far. You will find a shortcode for each form. Find out your desired form, and copy its shortcode.
Now, go to the post/page where you want to display the form. Paste the shortcode into the content editor and hit “Publish.” Load the content to check out the Google Form.
Final Words
Using a Google Form enables you to use the same form on multiple sites, share the data with an email marketing tool, and add a collaborator to the project. Now that you have read this in-depth guide, you know how to create such a form and display it on your WordPress site. Let me know if you have any other question about the process.


