How to Add a PayPal Donate Button to Your WordPress Site
You may run a non-profit organization, a charity organization, welfare foundation, a personal blog, or any other organization that depends on donations. Or it may be the case that you are raising money for a social cause.
Whatever this is, you need to add a donation button to your website. The button will make it a lot easier for potential donors to donate money, while you will have a fixed way to accept a donation from anyone.
Luckily, PayPal offers a ready-made solution to accept donations on your site. The company has created dedicated donation buttons that you can add to your site and start getting donations instantly.
There are two ways to add a PayPal donate button to your website –
- Using a plugin or
- Adding the button manually.
I will show both ways to do that. Let’s begin with the first method, which is using a plugin.
How to Add a PayPal Donate Button with a Plugin?
While there are several plugins available for the job, we will use the PayPal Donation plugin for this tutorial.
Install and activate the plugin, and then go to Settings > PayPal Donations to set up the plugin options. As you can see, the settings options are divided into two sections –

General
First of all, there is the “Account Setup” area. Provide your PayPal email address in the “PayPal Account” field and then, choose the default currency for the donation. The plugin supports all the common currencies including USD, Euro, AUD, Franc, Ruble, Krona, Peso, etc. with the appropriate symbol.
In “Optional Settings,” you can provide a custom destination page from your PayPal account. Then, “Return Page” enables you to add a custom thank you page that the visitor will see after making the donation.

Next, there is the “Defaults” area where you can provide the default amount, purpose, and reference for the donation. However, all of these are optional, which means you can skip these if you want.
“Donation Button” enables you to choose the button style. The plugin comes with three ready-made button styles to help you get started. It is also possible to use a custom donation button. If you choose the custom button option, you have to provide the button URL in the “Custom Button” field.
Lastly, you will have the option to choose the country and language for the button. This will localize the button text in your chosen language. You will find all common choices including English, French, German, Spanish, Italian, and so on.
Once you have made the changes, click “Save Changes” to apply these options.
Advanced

As you can guess, this section includes advanced options like disabling PayPal statistics, overriding the CSS style, opening PayPal in a new tab, removing line feeds, enabling PayPal sandbox, defining the checkout language, and so on.
Using the Widget
PayPal Donation also comes with a custom widget. You can use the widget to display the donate button on the sidebar, footer, or any other widget-supported location you want. Go to Appearance > Widgets, and you will find a widget titled “PayPal Donations.”

You will find separate options to provide the title, text, purpose, and reference for the donation. Once you have provided the necessary text, click “Save” to display the widget on your desired location.
How to Add a PayPal Donation Button Manually?
In case you don’t want to use a plugin, it is also possible to create and display the PayPal donation button manually. The first step is to visit the PayPal fundraising page –

As you can see, PayPal supports four ways to raise funds. You can choose any of these depending on your situation. For this tutorial, I will go with the “Personal Fundraising” option.
In the resulting page, go to the “Donate button” section and click the “Create a button” link to go to the button creation page. This takes you to a page like the following –

First of all, you will find an option to choose the button type, where you need to select “Donations.” Then, provide the organization or service name for which you are accepting the donation. It is also possible to provide a donation ID.
Next, you will find the customization section. You can use the default PayPal donate button or use a custom button image. If you are using the default button, you can choose to display the credit card logos, or choose the smaller button.

On the other hand, if you want to use your own button image, you can provide the button URL.
Next, you can choose the contribution amount. There are two options –
- Donors can provide the amount or
- You can fix the donation amount.
If you choose the second option, you can specify the donation amount.
Lastly, you need to provide the email address where you want to receive the donation. Then, click “Create Button.”
The next page will show the necessary HTML code for your donation button. Click “Select Code” to highlight all the code and copy the code.

You can use this code to display the donate button on any post, page, sidebar, footer, or any other widget-enabled location on your website.
Let’s find out how to show the button on the sidebar. To do that, log in to your website dashboard. Go to Appearance > Widgets, and find out the text widget. Drag the widget to the sidebar. Go to the text mode, and paste the copied code into the content section.
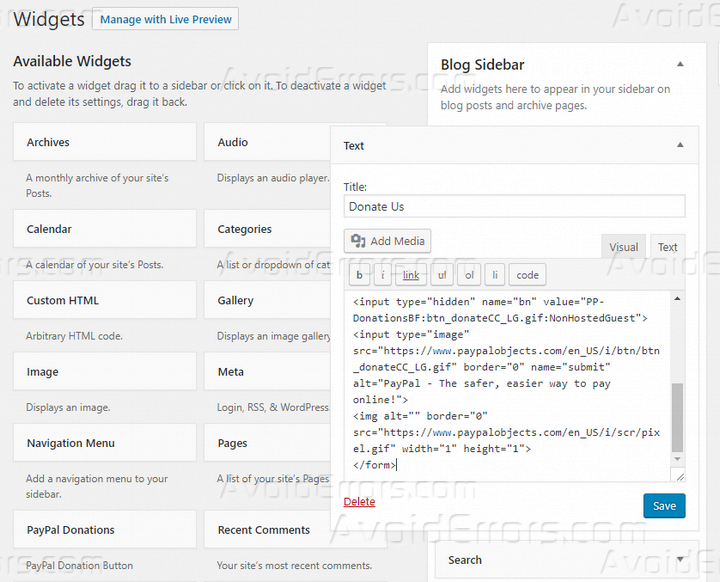
You can provide a widget title if you want. Then, click “Save” to add the donation button. Now, reload your website and enjoy the custom PayPal donation button on your sidebar.
Final Words
Adding a PayPal donate button is a great solution for both the pledger and the donors. Now that you have read this in-depth tutorial, you know how to add PayPal donate button to your WordPress site.
So, which of these methods do you prefer? Let me know in the comments below.


I didn’t know that it was so easy to set this up. Thanks for the guide.