How to Block and Unblock Internet Sites On a MacOS?
Blocking specific websites can keep you prolific during the workday, or decrease the chance of your children finding adult content, You can create a website “blacklist” on your Mac in many ways, While the built-in Parental Control feature are the easiest to use, you will need to use the hosts file instead if you want to block sites on an administrator account, and we are going to explain all of that step by step on 2 methods.
Method 1: Parental Controls
1. Open System Preferences, Click the apple icon in the top menu and press System Preferences. You can also find this in the Applications folder, and also on your Dock.

2. Click Parental Controls. On most versions of OS X, it’s labeled as a yellow icon. If you don’t see it, write “Parental Controls” on the search bar which located on the top right corner of the System Preferences window. This will highlight the correct icon.

3. Click on your child’s account. On the left-hand pane, hit on the user account for whom you want to block or unblock websites, then press “Enable Parental Controls.” This cannot be on an administrator account.
If your child doesn’t have an account, select the option “create a new account with parental controls” and follow the onscreen instructions.
If you can’t select the user, click the “Lock” in the corner of the window and type an administrator password.

4. Click on the Web tab. This is located near the top of the window. Some other versions of Mac OS X have a “Content” tab instead of it.
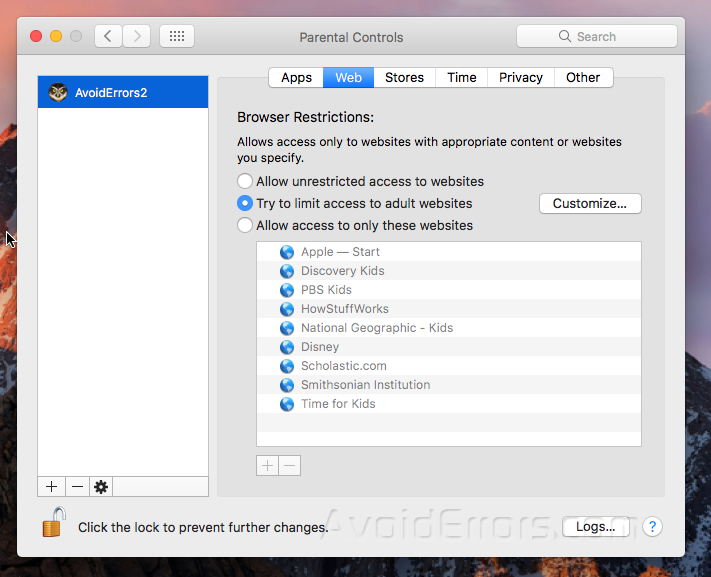
5. Explore the options to block websites. There are two ways to manage your child’s access to the internet:
by choosing “Try to limit access to adult websites automatically” this will block adult websites using Apple’s default list. You may want to add or remove websites to this list with the Customize button,”Allow access to only these websites” blocks all sites not specifically listed below this option. Add and remove sites using the “+” and “-“ buttons.

7. Want more additional restrictions?!, To block the access to the adult content through apps, click the App tab and adjust settings as desired. To limit access to the computer to certain hours, visit the “Time” tab.

8. Unblock websites, To unblock all websites, select “Allow unrestricted access to websites.” from the selections, This may not close the parental control settings in other tabs (such as Applications and People).

Method 2: Block the sites by the “Hosts” file
1. Run the Terminal application. Open Applications, then open “Utilities” folder, then Terminal. This application allows you to edit your hosts file, which provides IP addresses for specific URLs. By linking a false IP address with a specific URL, you can prevent your browsers from accessing it.
This method does not have a 100% success rate, and isn’t too difficult to bypass. It’s a quick way to block a website on your own computer, for productivity reasons. While not recommended it as the only way to block other users access, you can try it alongside another method for greater effect.

2. Backup your hosts file. If you make a mistake while modifying the hosts file, you could block all access to every website on the internet. Making a backup copy enables you to restore the original version if this happens. This is very simple as a single command in Terminal, write “sudo nano /etc/hosts” like it appears, and press Enter on your keyboard to run the command, and it may prompt for your password, type it and click Enter.

3. You’re now using the Nano text editor. You will be able to see something that looks like this.

4. Skip past the existing text. Your hosts file will contain several IP addresses linked to “localhosts.” NEVER edit or delete this text, or your web browsers will stop working. Move your cursor on a new line at the bottom of the document, If you are using the main Terminal window, use the arrow keys to reach the bottom of the page.
A few users have reported that there is a bug where adding new text to the hosts file only works if you add them above the existing text.
5. Write 127.0.0.1. This is the local IP address. If a web browser is directed to this address, it will fail to reach the web page, for example i will write www.avoiderrors.net

6. Adding more URLs on new lines. Hit Enter and start a new line with 127.0.0.1. Following with another URL you want to block it, You can block any number of websites, but you have to start each new line with 127.0.0.1.
In theory, you can include many URLs on one line (adding the IP address only one time), up to a maximum of 255 characters. However, this may not work on with some versions of Mac OS X.

7. Exit and save the hosts file. Close or quit the Text Edit dialog box when you are done, then confirm that you want to save the Text Edit file when prompted. (In some cases the file may save itself automatically.)
If you are modifying in the main Terminal window, press “ctrl+O” to save, and then “ctrl+X” to exit the file.
8. Back at the command line, write “sudo killall -HUP mDNSResponder” then press Enter, that will flush your Mac’s DNS cache, so it doesn’t get confused by any changes and to avoid conflicts you’ve made to the Hosts file, it may prompt for password type it and press Enter.

** Don’t forget you’ve modified the Hosts file, because at some point you may need to undo the changes you’ve made in order to keep your Mac working right.**


