Change File Permissions to Bypass Trusted Installer
Every windows got a “TrustedInstaller” which is a security principal that prevent any user from deleting such important system files like the files located on “C:/Windows” some of this files might exceed a gigabyte and if you want to save space you will have to delete some of it, In this tutorial I will explain step by step how you can change the file/folder permissions to bypass trusted installer, follow the below steps to guarantee a successful result.
1. Locate the protected folder that you want to edit its permissions and right click and select “Properties”.

2. Click on “Security” tab, and then click on “Advanced”, just like the below screenshot.

3. click on “Add” so you add the username which can edit the folder permissions.

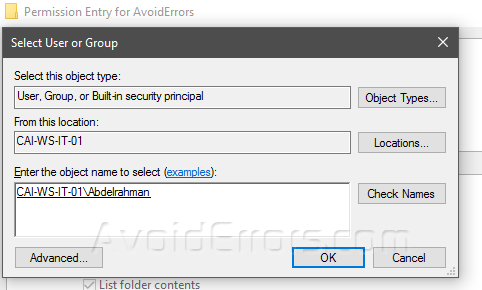
4. Click on “Select Principal”, just like the below screenshot.

5. Write your username, and then click on “Check Names” so you make sure that you are adding the correct user, then click OK.
6. Now, the user you just added can set the permissions.

7. Sometimes you will need to restart your computer so changes can take effect.
Summary
After this tutorial, you should be able to know how you can add a principal user which has the ability to delete or edit any system files without asking for permissions or giving errors.


