How to Create an Editorial Calendar for Your WordPress Site
All professional blogs have an editorial calendar. Having such a calendar will help you get a complete overview of the content and to plan the future content for your blog. There are several WordPress plugins to help you create an editorial calendar.
In this tutorial, I will use the Edit Flow plugin to show you how to create an editorial calendar. Let’s get started, shall we?
Using the Calendar
First of all, install and activate the plugin on your WordPress site. This will create a new menu item titled “Edit Flow” on your dashboard. You can check out the calendar by going to Edit Flow > Calendar and opening the customizable calendar.
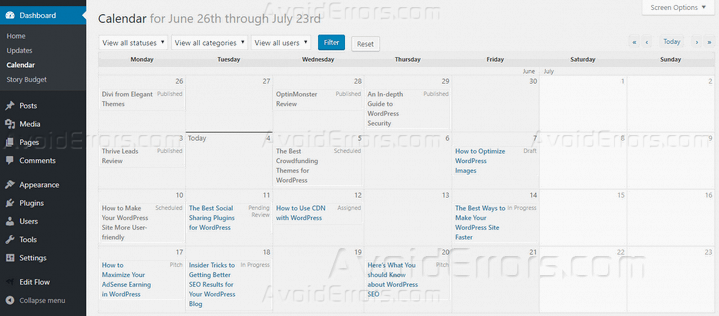
At this point, the calendar will show the published, draft, and pending review posts on your blog. By default, it shows the posts for six weeks. You can change this by going to Screen Options > Number of Weeks.
There are some filtering options to help you sort the content according to their status, category, user, etc. Use the “Reset” button to clear all the applied filters.
Hover over the top-left corner of any date, and you will find a small “+” icon. Clicking this icon enables you to a schedule a post for that date. You can provide the post title and schedule the post or go to the editing screen for that post.

Clicking on any post on the calendar will provide you with the author name, date and time, tags, category, and separate links to edit, delete, view, follow, or unfollow the post. You can change the post tags and category by clicking on the respective name.
Edit Flow offers a simple way to reschedule the upcoming posts. You just need to drag and drop the posts into the desired date and that’s it, the post will be scheduled with the new date.
Exploring the Post Editor Options
Edit Flow will add several options to your existing post editor. First of all, you can change the status from the “Publish” section. If you want to assign a post to an author, choose “Assigned” as the status. Then, open the Screen Options and check the “Author” box. This will show a drop-down list for choosing the author at the bottom of the post.

The “Editorial Comments” section will be very useful to provide feedback about the post. Your team members can use this section to leave their comments about the post. The author will receive notifications about the comments.
If you want other people to stay updated about the post status, head towards the “Notifications” section. You can choose individual users or user groups who will receive notifications about the status changes and editorial comments.
“Editorial Metadata” section is the place where you can inform the author about the post requirements. Depending on the post type, you can set the deadline, minimum length, keyword usage, image requirements, linking to other resources, and other editorial guidelines.
Setting up the Plugin Options
Along with the calendar and post options, the plugin also comes with lots of configuration options for the various features. Let’s take a look at these options.
Edit Flow

This section offers a grid view of all the plugin’s features like the calendar, statuses, editorial comments, metadata, notifications, and so on. You can enable or disable any of these features and also go to the settings options for that feature.
Calendar
Here, you can choose to display the posts, pages, or both in the calendar. You can also decide to create posts or pages from the calendar.
Custom Statuses

As you can guess from the name, this section enables you to create and manage custom statuses for your content. The plugin comes with some default statuses like pitch, assigned, in progress, draft, pending review, etc. You can edit any of these statuses or create new status from the left column. It is also possible to choose a default status for the posts created from the calendar.
Dashboard Widgets
Edit Flow comes with some dashboard widgets that display the posts status, links to the posts you are following, and a notepad. You can enable or disable any of these widgets from this section.
Editorial Comments

You can use editorial comments to communicate with the author about any content. This section allows you to enable the comments for posts, pages, or both.
Editorial Metadata
Using metadata is an effective way to inform the authors about your requirement for the content. The plugin comes with some default metadata like the first draft date, assignment, needs photos, word count, etc.
You can edit any of these or create a new metadata. Depending on your requirement, you can create different types of metadata including checkbox, date, location, number, paragraph, text, and user.
Notifications

As you can guess from the title, this is the section for managing notifications. You can enable notifications for posts, pages, or both, and also choose to always notify the blog admin.
User Groups
Creating user groups is a simple way to manage the users of your website. You can use the default groups like Copy Editors, Photographers, Reporters, Section Editors, etc., or create your own groups. A single user can belong to multiple groups at the same time.
Final Words
Managing a blog is a demanding task. You can make it easier by using an editorial calendar. Just install the Edit Flow plugin and follow the steps I discussed above. Let me know if you have any more question about using the plugin. I will be glad to help you out.


