How to Create an Image Gallery in WordPress
On some occasions, you may need to display multiple images at once. The best way to do that is to create a gallery containing the images and add the gallery to your post. There are two ways to create an image gallery in WordPress –
1. Creating the gallery manually or
2. Using a plugin.
In today’s post, I am going to show you both ways of creating the gallery. Let’s get started with the manual approach first.
How to Create an Image Gallery Manually?
First of all, go to Posts > Add New. In the post editor, click the “Add Media” button. Make sure you have already uploaded the images you want to add to the gallery.
Once you have the necessary images available in the media gallery, click the “Create Gallery” link from the left menu.

Next, choose the images you want to add to the gallery. Just click on the image, and it will be selected with a check mark displayed on top of it.
Choose all the images you want, and click the “Create a new gallery” button. This will take you to the gallery editing page.

In the edit page, you can drag and drop the images to change their order. The right menu will allow you to choose the number of columns and the size of the images. Check the “Random Order” box to display images on a random basis.
You can remove any image from the gallery by clicking the cross icon on the image. Use the “Add to Gallery” link on the left side to add new images to the gallery.

Once you have made the necessary changes, click the “Insert gallery” button to add the gallery to your post. You can edit the gallery by clicking on any image and tapping the edit icon.
And that’s how you add an image gallery manually.
While that was an easy task, it doesn’t offer you that many customization options. You need to use a plugin to get these options. And that’s what I will show you next.
How to Create an Image Gallery with a Plugin?
There are lots of gallery plugins available for WordPress. For today’s tutorial, I will use NextGEN Gallery, an incredibly popular image gallery plugin with lots of useful features.
Once you install and activate the plugin on your website, you will notice a new menu item titled “Gallery” in the website dashboard.
Creating a Gallery with NextGEN
To create a gallery, go to Gallery > Add Gallery/Images from the dashboard. There are three ways to create the gallery.

Upload Images
If you want to upload new images to the gallery, you should choose this option. Provide a name for the gallery in the “Gallery title” field.
Tap the “Add Files” button to select the images from your hard drive. Once you have selected the images, click “Start Upload” to upload and add these images to the gallery.
Import from WordPress Media Library
As you can guess, this option is for creating a gallery by using the existing images from your media library. Provide your gallery name in the “Gallery title” field, and click the “Select images” button.
This will open the media library containing your uploaded images. You can select multiple images by holding down the Ctrl key and clicking on your desired images. Choose all the images you want to add to the gallery and click “Select.”
Finally, click the “Import images” button to add your selected images to the gallery you just created.
Import Folder
On some instance, you might want to create a gallery by using the images uploaded to your server. This option enables you to do that.
To get started, select the folder from which you want to use the images. Provide a gallery title and click the “Import” button. This will import and add the images to the gallery.
How to Display a NextGEN Gallery
Now that you have created a gallery, it is time to display the gallery in your content. To do that, go to Posts > Add New or edit the content where you want to add the gallery. You will notice two new icons in the post editor –
![]()
Click the “Add Gallery” button to insert the gallery. This will open a lightbox like the following –
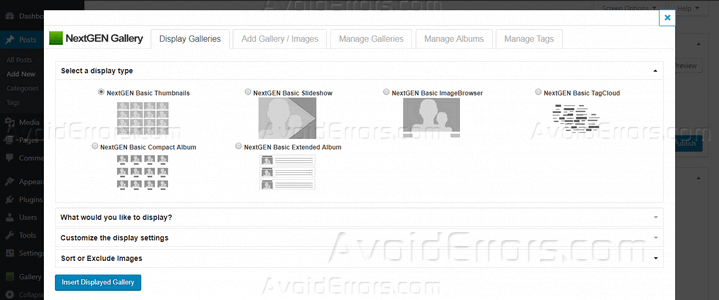
Make sure you are in the “Display Galleries” tab. As you can see, you have several options to manage the basic gallery settings. Let’s find out what these options can do.
In “Select a display type,” you can choose any of the six styles for your gallery.
Next, “What would you like to display” enables you to select which gallery you want to display. Click inside the “Galleries” field to bring a list of the available galleries and choose your desired gallery.

“Customize the display settings” allows you to manage various options like image size, the number of columns, enable AJAX pagination, show slideshow link, and choose the template.
Finally, “Sort or Exclude Images” enables you to define the sorting order and exclude any image from the gallery.
After you have made the changes, click “Insert Displayed Gallery” to add the gallery to your content.
Configuring the NextGEN Gallery Settings
NextGEN Gallery comes with lots of configuration options to control the style, look, and behavior of the galleries. Let’s take a minute to check out these options.
Go to Gallery > Manage Galleries to edit the galleries you have created. The page will provide you with a list of the existing galleries. Click on any gallery to edit its title, description, and the image alt text, tag, etc.

You will find the gallery styling options in the Gallery > Gallery Settings page. It allows you to personalize the styles for the basic thumbnails and each of the six gallery variations.
All the other plugin options are located in the Gallery > Other Options page. You will find separate tabs to manage the image, thumbnail, lightbox, watermark styles along with the options to define which user roles can access the NextGEN options.
Final Words
And that’s how you create image galleries on a WordPress site. Now that you know the different ways to create a gallery, it should be a lot easier for you to display multiple images at once. Let me know if you need any more help.


