How to Display Your Resume on WordPress
You need a dedicated solution to display resume on your portfolio, family, business, corporate, or company website. Some premium themes come with a ready-made solution to help you do that.
In case your theme doesn’t have that feature, you have several other options. There are some great plugins to help you create and display resume on your WordPress site.
In today’s tutorial, we will use a plugin called Resume Builder to display the resume on your website. The first step is to install and activate the plugin on your website. This will add a new menu item titled “Resumes” in your dashboard menu.
Creating the Resume
Go to Resumes > Add New to add a new resume. This will take you to a page like the following –

First of all, provide a name for the resume. Then, move on to “The Resume Builder” section. Click the “Add Resume Section” button. This will provide you with two options –
- Introduction Block: This block enables you to provide a short description of
- Default Block: You can use this block to show your education, experience, testimonials, and so on.
Choose the introduction block to get started. This will open the block settings –

The first fields enable you to provide the title and sub-title for the section. Next, you can upload a photo in the “Introduction Image” field. Provide a short description of yourself in the “Introduction Text” field.
“Introduction Buttons” allows you to add buttons to this section. You can add various buttons like contact, portfolio, address, etc. For each button, you can customize the label, link, and style.
Next, we need to add the other sections of your resume. To do that, click the “Add Resume Section” button and choose the default block. This will open a section like the following –

Provide a title for the block. Then, click the “Add Subsection” button, which provides you with two options –
- Text Block and
- Detailed Row
Text Block
As the title suggests, this is a standard text area where you can add text and media files. You can use this block to describe the section.
Detailed Row

This subsection enables you to add more details about the section. You will find separate fields to provide the title, subtitle, side text, and the main text for the row.
You can add as many sections, subsections, and blocks as you want. Each section and block comes with dedicated buttons to delete or duplicate the unit. It is also possible to drag-and-drop the elements inside a section.
Once you have added the necessary information, click “Publish” to save the resume on your website.
Adding Contact Information and Skills
Resume Builder comes with a custom widget to help you display the contact information and your skills to the visitors. You can add this information when you are creating a new resume. In case you have already created a resume, go to Resumes > Resumes to edit the resume and add the necessary information.
Find out the “Resume Widgets” section that looks like the following –

You will find separate fields to provide the contact information section title, email address, phone number, website, and address.
Use the “Skills Title” field to provide a title for your skills section. Next, click the “Add Skill” button to add your skills. For each skill, you can provide a title, provide a short description, and a rating to show your expertise for that skill.
You can add as many skills as you want and re-order them by using the drag-and-drop interface. It is also possible to delete or duplicate any skill by using the dedicated buttons.
Once you have provided the necessary information and added the skills, click “Update” to store the information on your website.
Displaying the Resume
The Resume Builder plugin offers several ways to display the resume and other information. First of all, there are four custom shortcodes for displaying the full resume, intro, skills, and contact information.
You will find all the shortcodes at the top of the resume builder page. They look like the following –
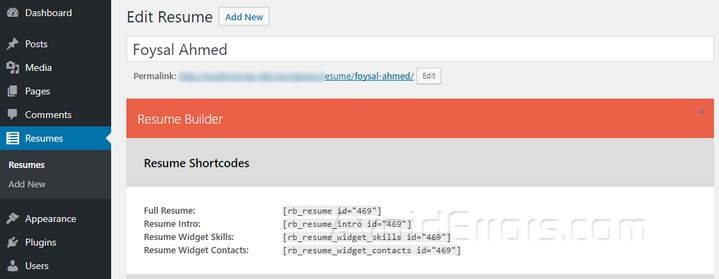
You can use these shortcodes to display the content in any post, page, or widget. Make sure you are using the shortcode in the text mode, as these won’t work in the visual mode on the post editor.
The plugin also comes with a custom widget to help you display the resume, contact details, or the skills on the sidebar, footer, or other widget-enabled locations. To use the widget, go to Appearance > Widgets, and find out the widget titled “RB Resume Widget”.

Drag the widget to your desired location. Provide the resume shortcode for the type of information you want to display. Finally, click “Save” to enable the custom widget.
Creating Multiple Resumes
In some instances, you may want to create and display the resume of multiple people on your website. You can do that in the same way as described above.
First of all, you need to go to Resumes > Add New to create another resume. Then, add the necessary resume sections, blocks, and provide the necessary information. Once you have created the resumes, you can manage them from the Resumes > Resumes page from your dashboard.

For each resume, you will find the name and the date when the resume was created. You can edit, view, or delete any resume you want. What’s more, each resume will have a unique code. That means you can easily display the resumes on any place of your website.
Final Words
Your website is the best place to display your resume. Thanks to the awesome plugins like Resume Builder, it has become a lot easier to create and display resume on WordPress sites. The plugin allows you to create detailed, fully functional resumes within a few minutes.
So, what do you think about the Resume Builder plugin? Does it offer all the resume building features you need? Let me know by leaving a comment below.


