How to Dual Boot Windows 10 and Ubuntu
Many users want to use both Windows and Ubuntu on the same PC because of many reasons like easy data recovery in case either OS fails to boot and dual booting allows more access to hardware components, and in general, it’s faster than utilizing a VM. This article assumes that Windows 10 is already installed on your PC.
If there is no Operating system installed on your PC and you want to use a Windows variant alongside Ubuntu, then you should first install Windows OS and then Ubuntu.
- You’ll need to Download Ubuntu
- Also download Etcher to create a bootable USB
If the system is installed on a single partition, then you need to create free space on the computer hard disk.
For this Login with an administrative account to the machine on which Windows 10 is installed. Right click the Start menu and Select Command Prompt (Admin). You will see a command window on the screen.

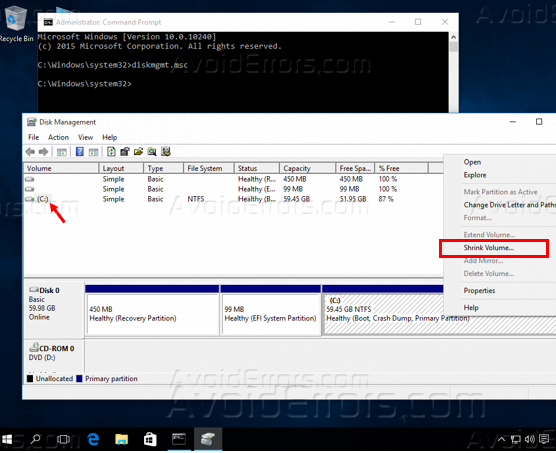
In Command Window, type diskmgmt.msc.

A Disk Management Utility will get Opened. Now in order to resize the partition, In Disk Management Right Click on C: and select Shrink Volume.
On Shrink C: enter a value on space to shrink in MB (use at least 20000 MB depending on the C: partition size) and Click Shrink to start partition resize.

A new Unallocated disk will appear on the harddisk.

Installing UBUNTU
For this, you first need to Burn the image to a DVD or make a bootable Ubuntu live disk with Etcher.
1. First, Select Ubuntu ISO File.
2. Insert a USB flash drive(size must be at least 2GB), and then select it in Etcher.
3. Click on the Flash button.

Place the USB stick or DVD in the appropriate drive, reboot the machine and instruct the BIOS to boot-up from the DVD/USB by pressing a special function key (usually F12, F10 or F2).
Once the media boot-up a new Grub screen should appear on your screen.
From the menu select Install Ubuntu and press Enter to continue.

Now after this installation completes, a completely working Ubuntu will start running in live-mode.
You will see a launcher on the screen. On the Launcher, Select the second option at the top right side named as Install Ubuntu 16.04 LTS and Installer Utility will get started.
Select the language in which you want to install Ubuntu and click Continue button.

On the first page, the installation tool will ask the user to Download updates during installation.
Select the checkmark box next to it, as it saves time, also check the box next to Install third-party software.
This will make it so any drivers, proprietary media codecs, etc., are installed. Select the Continue button.

Now you have to choose the installation type. You are provided with 5 options. Choose the first option which is Install Ubuntu alongside Windows Boot Manager and click Continue. This will automatically take care of all the partition steps. But if you want a custom partition layout then check Something else option and then click Continue.

The partitions need to be set up correctly. For this use the slider and drag one side left or right to make either the Ubuntu installation or the existing Windows installation larger, then select the Install Now button.

Now the next step is to select the physical location of your machine. Select a nearby city and Click Continue to further proceed.

Select the keyboard layout and click Continue and move to the next step.

Enter the user name and password for your account. Enter your PC name and Click Continue.

It will start installing Ubuntu.

After installation is about to finish, a dialog box will appear. Click on the Restart now button to reboot the PC.
To load Ubuntu you either wait for 5 sec or press Enter. If you want to load Windows then use arrow keys to select Windows and press Enter.

After the loading of Ubuntu, enter password to login


