AvoidErrors
  • HOME
  • WINDOWS
  • APPLE
  • MS OFFICE
  • RASPBERRY PI
  • WORDPRESS
  • TECH TIPS
  • LINUX
  • VIRTUALIZATION
  • FORUM
No Result
View All Result
AvoidErrors
No Result
View All Result

How to Force Proxy Settings via Group Policy on Windows Server 2012

Miguel by Miguel
November 6, 2017 - Updated on September 8, 2021
in Windows
0
Share on FacebookShare on Reddit
Download this tool to Recover Deleted Files and Photos

This tutorial will explain step by step how you can force the proxy settings to your network computers by Group Policy on Windows Server 2012, as it’s known proxy servers are very useful in the business environments because it can prevent the users from accessing specific websites and it also helps the network administrator to analyze the internet traffic.

There are too many available proxy servers on the market you can google it and choose what you like, follow the below steps to guarantee a successful result.

1. Click on Tools from Server Manager and then click on “Group Policy Management”.

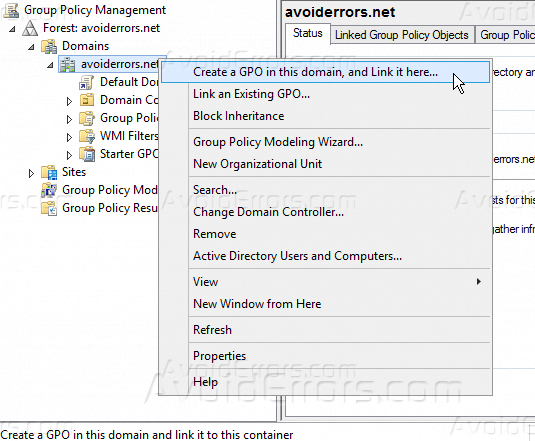
2. Under your domain name, right click on it and then click “Create a GPO in this domain, and link it here”.

3. Give your GPO a name to identify it later if you want to do changes.

4. Right-click on the new GPO and then click “Edit”.

5. Under “User Configuration” go to “Preferences” >> “Control Panel Settings”  >> “Internet Settings”.

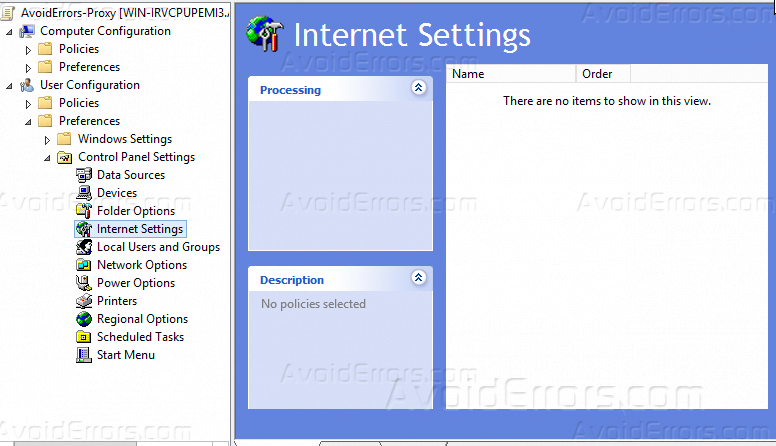
6. Right-click on “Internet Settings” and point to “New” and then select your using

7. Click on “Connection” tab then click on “LAN Settings”.

8. Make sure to check “Use a proxy server for your LAN (These settings will not apply to dial-up or VPN connections)”, and then specify the address of your proxy server or add its IP address and ensure to type”8080″ into the port field, also check “Bypass proxy server for local addresses”, just like the below screenshot.

9. You can also add a specific proxy server for different protocols by clicking “Advanced” on “LAN settings”, but to do that you have to uncheck “Use the same proxy server for all protocols” otherwise it will be uneditable like the below screenshot.

Summary

After this tutorial, you should be able to know how you can force proxy settings to all the users in your network through Group Policy on Windows Server 2012.

Previous Post

Enable Ransomware Protection on Windows 10

Next Post

How to Use Custom Fields in WordPress

Miguel

Miguel

I started this tech blog back in 2011 as a place to write down processes I took to fix my client systems and network. Now I write some tips and tricks to help others with the tech issues that one might encounter.

Related Posts

Disable Windows Defender SmartScreen – Windows 11
Windows

Fix Windows 11 Defender Not Working

by Rhousse
January 24, 2023
How to Fix 503 Service Unavailable Error in Windows 10 
Windows

Fix HTTP Error 503: The Service is Unavailable in Windows 11

by Rhousse
January 24, 2023

Subscribe to get weekly tutorials direct to your inbox!

Disable Windows Defender SmartScreen – Windows 11
Windows

Fix Windows 11 Defender Not Working

by Rhousse
January 24, 2023
How to Fix 503 Service Unavailable Error in Windows 10 
Windows

Fix HTTP Error 503: The Service is Unavailable in Windows 11

by Rhousse
January 24, 2023
How to Modify Mouse Pointer in Windows 10
Windows

How to Fix Black Screen With Cursor in Windows 11

by Rhousse
January 24, 2023
Restore the Old Windows Desktop Icons – Windows 11
Windows

Fix and Enable Drag and Drop on Windows 11

by Rhousse
January 24, 2023


  • Disclaimer & Privacy Policy
  • FAQ
© 2022 Powered by Cloudways
No Result
View All Result
  • HOME
  • WINDOWS
  • APPLE
  • MS OFFICE
  • RASPBERRY PI
  • WORDPRESS
  • TECH TIPS
  • LINUX
  • VIRTUALIZATION
  • FORUM

© 2022 AvoidErrors Powered by Cloudways | Privacy

Welcome Back!

Login to your account below

Forgotten Password?

Retrieve your password

Please enter your username or email address to reset your password.

Log In
This website uses cookies. By continuing to use this website you are giving consent to cookies being used. Visit our Privacy and Cookie Policy.