How to Access OwnCloud from the WAN
Enable SSL for Secure External Access
This process only applies if you are planning on connecting to the ownCloud from the WAN (outside the network) using mobile devices or tablet. Enable and configure SSL on Owncloud:
1. Open the terminal and run the following command:
sudo a2enmod ssl
2. Create a new directory for the self signed certificate:
sudo mkdir /etc/apache2/ssl
3. Create the self signed certificate and the server key that protects it, and placing both of them into the new directory:
sudo openssl req -x509 -nodes -days 365 -newkey rsa:2048 -keyout /etc/apache2/ssl/owncloud.key -out /etc/apache2/ssl/owncloud.crt
Note: The above certificate is valid for 365 days. We have mentioned validity days in the command.
4. Now we need to setup the certificate:
sudo nano /etc/apache2/sites-available/default-ssl.conf
5. The lines that need changing are the following:
ServerName IP :443
SSLEngine on
SSLCertificateFile /etc/apache2/ssl/owncloud.crt
SSLCertificateKeyFile /etc/apache2/ssl/owncloud.key

6. Activate the new virtual host
sudo a2ensite default-ssl
7. Restart apache
sudo service apache2 restart
Port Forward for External Access
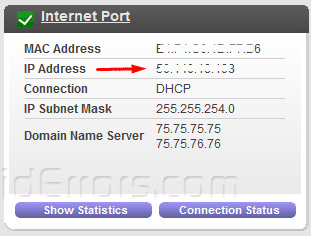
Log into your router and get the WAN IP address:
Now we need to add the WAN IP to your trusted IP list and not to be overwritten by ownCloud. To do this open the Owncloud config file, enter:
sudo nano /var/www/html/owncloud/config/config.php
Here add the WAN IP (External IP address) you just got from the router to the trusted domains array. Your new entry should look something like this:
1 => 'xxx.xxx.xxx.xxx',
X are just placeholders. Replace the X’s with the WAN IP Address.
Now update the URL of the overwrite.cli.url line with your WAN IP Address. It should look something like this:
‘overwrite.cli.url’ => ‘https://xxx.xxx.xxx.xxx/owncloud’,
Here is an example of the completed config.txt file.
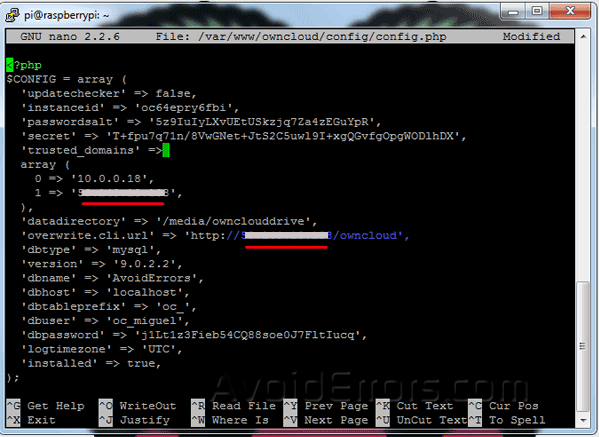
Hidden is the WAN IP. Once done save and exit.
Log back into your router and navigate to the port forward section.
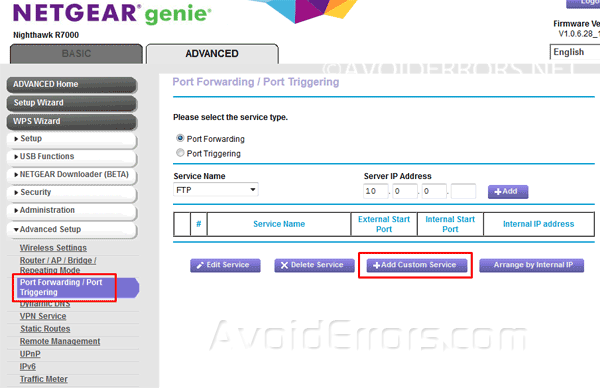
Now port forward SSL port 443 to the Ubuntu server runnung ownCloud instance internal IP (LAN IP) address and save settings.

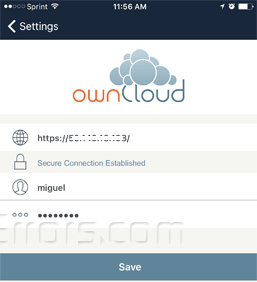
Now your ownCloud is ready to be accessed externally (WAN) and from your devices just download the ownCloud App and enter: “https:// WAN IP Address” on the address bar or devices. below is an example:
Basic First Access Setup
This applies in case you did not set it up from the LAN previously.
1. Accessing your ownCloud from outside the network: open your browser and enter the WAN IP address. i.e. “https://50.0.0.18/owncloud” you’ll be directed to your ownCloud storage server.
2. Accessing ownCloud From inside the network: open your browser and enter the Ubuntu IP address provided, in my case is “https://192.168.1.123/owncloud” you’ll be directed to your ownCloud storage server.
3. Because we installed SSL for more security you might get a certificate error, simply add the certificate to your exception list to proceed

4. You should be presented with a simple setup s


