How to Install WordPress on Ubuntu Server 18.04
WordPress is an open source web development tool that powers about 30% of the internet. WordPress is the most popular and powerful content management system.
In this tutorial, we will be installing WordPress on Ubuntu Server 18.04 Before starting this step by step tutorial, ensure that you have the following requirements:
- Access to an Ubuntu server
- Install LAMP on Ubuntu. The server must have a LAMP stack installed. For WordPress to run smoothly, it requires a web server, PHP, and a database.
- User with sudo privileges. In this tutorial, the sudo user is ‘avoiderrors’.
Step 1: Create a database and user for the new WordPress site
First, we are going to create a database ‘avoiderrors’ and assign it to user ‘avoiderrors’. Log in as root or sudo user for this step.
The lines of code you require are highlighted in yellow throughout the tutorial.
sudo su
mysql -u root –p

//After successfully logging in

CREATE DATABASE avoiderrors DEFAULT CHARACTER SET utf8 COLLATE utf8_unicode_ci;

GRANT ALL ON avoiderrors.* TO 'avoiderrors'@'localhost' IDENTIFIED BY 'password';

//Save changes

FLUSH PRIVILEGES;

//Exit

EXIT;

Step 2: Install essential PHP extensions.
Before installing any package on Ubuntu, always start with the command ‘sudo apt-get update’ to update the system.
In this step, we will install the necessary PHP extensions for WordPress.
The first line of code is for switching from root user to avoiderrors (sudo user). Write the following code on your terminal:
sudo apt update
sudo apt install php-curl php-gd php-mbstring php-xml php-xmlrpc php-soap php-intl php-zip

Step 3: Adjust the Apache configuration.
The main reason why we need to perform these configurations is to allow .htacess rewrites and overrides. For this tutorial, my configuration file for my site is avoiderrors.tk.conf and my root directory is /var/www/avoiderrors. Make sure to substitute the above entries with your own.
The default config file is 000-default.conf and the default root directory is /var/www/html if you are only running one website on the server. Type the following code to edit your config file using nano:
sudo nano /etc/apache2/sites-available/avoiderrors.conf
![]()
Within the VirtualHost block, paste the block of code below with the correct directory:
<Directory /var/www/avoiderrors/>
  AllowOverride All
</Directory>
![]()
Save the file and exit. Write the following code to enable rewrites and restart Apache:
sudo a2enmod rewrite
sudo apache2ctl configtest
sudo systemctl restart apache2

Step 4: Downloading the latest version of WordPress
In this step, we will download WordPress latest release and extract the file on a writable directory (/tmp). We are also going to create a .htaccess file, wp-config.php file and a directory for updates. Finally, we are going to move all the content from ‘/tmp’ to our WordPress website’s root directory. Sell illustrations below:
cd /tmp

apt install curl

curl -O https://WordPress.org/latest.tar.gz

Create a .htaccess file for your WordPress
touch /tmp/WordPress/.htaccess
Copy the sample config file to the default WordPress config file
cp /tmp/WordPress/wp-config-sample.php /tmp/WordPress/wp-config.php
Create a directory for updates.
mkdir /tmp/WordPress/wp-content/upgrade
Finally, we are going to move all the content from ‘/tmp’ to our WordPress website’s root directory.
sudo cp -a /tmp/WordPress/. /var/www/avoiderrors
Step 5: Setting up the WordPress directory
Write the following code to adjust the ownership and permissions of the directory:
sudo chown -R www-data:www-data /var/www/avoiderrors

sudo find /var/www/avoiderrors/ -type d -exec chmod 750 {} \;

sudo find /var/www/avoiderrors/ -type f -exec chmod 640 {} \;
The second part of this step is the most important. This is where we configure the wp-config.php file. We need to edit the following:

Type the following command on the terminal to generate unique secret keys:
Curl –s https://api.WordPress.org/secret-key/1.1/salt/
Now type the following command to edit wp-config using nano:
Sudo nano /var/www/avoiderrors/wp-config.php
Find and change the following MySQL settings accordingly:

Add this line:
![]()
Finally, replace the dummy secret keys with the ones we generated. Dummy keys look like this:

Once replaced, they should look like these:

NOTE: Do not copy the above keys! Generate your own keys for your site’s security. If you followed all the steps in this tutorial, go to your browser and type your domain name or IP-address. The screen should look like this:
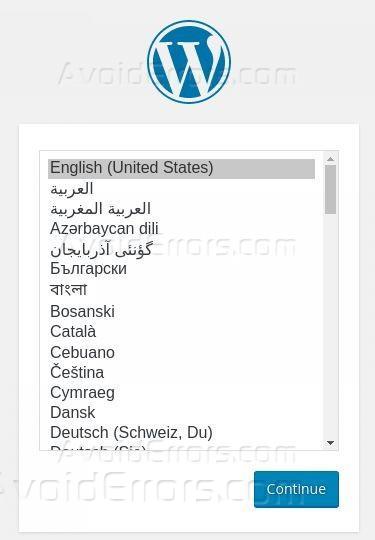
This page is proof that you have installed WordPress on Ubuntu. In case you run into any problem, ensure that you have consistently used the correct directory paths throughout. If successful, configure your preferred settings and enjoy WordPress on Ubuntu!


