How to Partition a Disk by Shrinking the Volume
In this article, I will explain how we can create a new partition on a disk by shrinking the old disk drive to gain the space. Partitions are used to store different types of data so that you can easily manage your data. Like a partition for office, the document will help you easily identify the documents.
To start this process, follow the following steps. Click on Start menu and type Disk Management, you will see a control panel shortcut for Disk Management.

Click on it to open disk manager.

Now right click on the drive which you want to shrink, In this case, we will shrink C drive, so right click on C drive and select Shrink.

This will start querying the disk to analyze how much space can be retrieved by shrinking the disk.

Once queried, it will show you the size which can be shrunk.

Enter the amount of space you want to shrink. If you want to do with default options, click on Shrink button. Once shrunk, you will see newly unallocated disk space.

Right click on the unallocated disk space and select New Simple Volume.
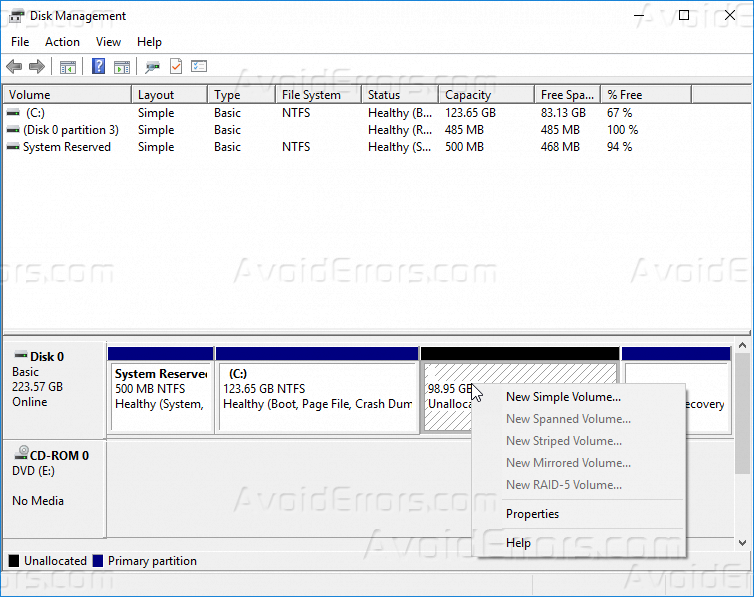
This will start the partition creation wizard. Click next to start the process.

Now enter the size of the disk you want to create a partition and click Next.

Now assign the Drive latter for new disk partition and click Next.

Now enter the label for the disk so that it can easily be identified for what sort of data is placed in the disk. Please make sure to perform quick format check box is selected. Now click Next.

It will display the summary what it is going to do, now click on Finish.

Once completed, you will see that a newly created disk in disk management app.


