ownCloud: Configure Strict Transport Security (HSTS) and Memory Cache
The “Strict Transport Security” HTTP header is not configured to at least “15552000” seconds. For enhanced security we recommend enabling HSTS as described in our security tips.
When you go to the Admin console, you might see Security and Setup Warnings after upgrading or enabling SSL in OwnCloud.
No memory cache has been configured and The “Strict Transport Security” HTTP header is not configured warning messages. Here is how I managed to resolve it.
Strict Transport Security HTTP Header
The “Strict-Transport-Security” HTTP header is not configured to least “15768000” seconds. For enhanced security we recommend enabling HSTS as described in our security tips.

The instructions provided in their Security Documentation is good but here is a simplified solution
Access the SSl.conf file. To do this open the terminal and type:
/etc/apache2/sites-available/owncloud-ssl.conf
or
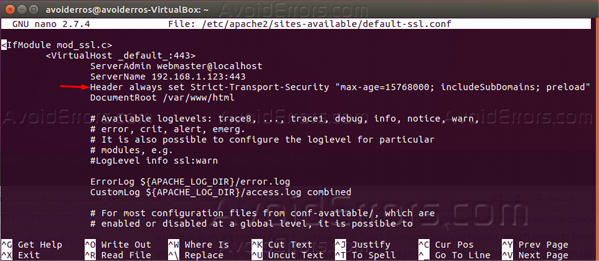
/etc/apache2/sites-available/default-ssl.conf

Add the following snippet of code to the SSL.conf file as shown:
Header always add Strict-Transport-Security "max-age=15768000; includeSubDomains; preload"

Enable module headers:
a2enmod headers

Restart your apache2 server.
sudo service apache2 restart

Memory Cache
No memory cache has been configured. to enhance your performance please configure a memcache if available. further information can be found in our documentation.

1. Open the Terminal and execute the following command:
sudo -s
You’ll be prompted to enter the root user password.

2. Now install php-apcu:
apt-get install php-apcu php-apcu-bc

3.Then install Nautilus to be able to edit the config.php file:
apt-get update
apt-get install gksu nautilus
if the previous command did not work the use:
apt-get install nautilus
Do not close the terminal.

4. Once nautilus has been installed press Alt+F2 on your keyboard to open the search.
Here search for gksu Nautilus and hit enter.

5. You’ll be prompted to enter admin password.

6. Once you enter the admin password the home screen will open, here go to + Other Locations -> computer.

and navigate to: /var/www/owncloud/config/config.php

7. Add the following line of text to the config.php file exactly like you see it on the image below:
'memcache.local' => '\OC\Memcache\APCu',

8. Once you have added the line click Save. Then go back to the terminal and re-start apache2 by executing the following command:
sudo service apache2 restart

Done!! Go to the admin section of your owCloud instance and refresh, the warning should be removed. It should say All checks passed.
Video Tutorial:


if u get issue after follow this tutorial, change the quotes:
Tutorial Line: ‘memcache.local’ => ‘\OC\Memcache\APCu’,
Correct Line: ‘memcache.local’ => ‘\OC\Memcache\APCu’,
Apart from that, best tutorial of Internet, thanks!!!