How to Show Pop-ups with the Popup Maker Plugin
Popup Maker is an excellent free plugin that enables you to create and display powerful popups on your WordPress site. In today’s post, I will introduce you to this plugin and show you how to use all the available features.
First of all, install and activate the plugin on your website. This will create a new menu item titled “Popup Maker” in your dashboard menu.
Adding a New Popup
To add a new popup, go to Popup Maker > Add Popup. This will take you to a page like the following –

The first two fields are for the popup name and title. Among these, the name will help you to identify this popup from the other ones you may create later on. This name will not be displayed to the visitors. On the other hand, the title will act as the title of the popup and will be displayed to the visitors.
The content area is where you will provide the main popup text. As the plugin uses the default WordPress text editor, you can easily add and edit the popup text, add media files, and apply the available formatting options.
Below, you will find the configuration options for the popup. There are two types of triggers available for you –
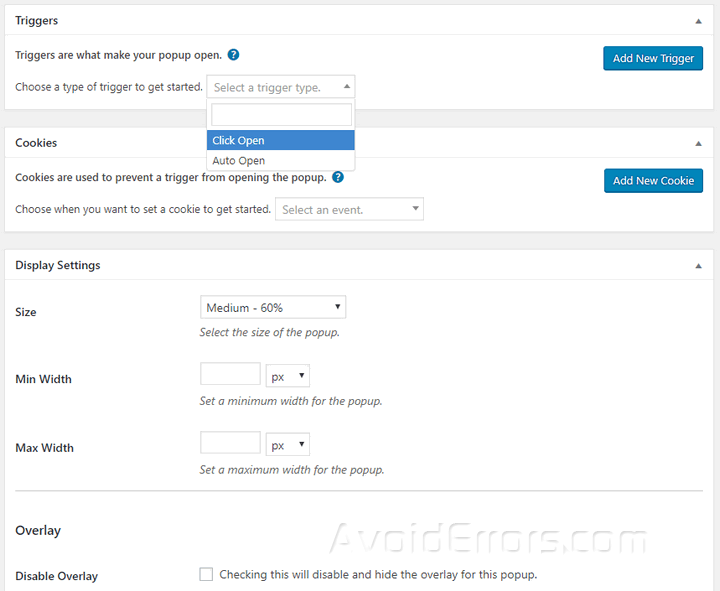
- Click Open: This method allows you to trigger the popup when the visitor clicks an element. For instance, you can create a button or add a link to your posts asking them to sign up to your newsletter. Clicking that button or link will open the popup containing the subscription form.
- Auto Open: In this method, you can set the popup to open automatically after a specific amount of time.
Next, there is a section titled “Display Settings.” Here, you can choose the size, minimum, and maximum width for the popup. The “Disable Overlay” checkbox enables you to disable the overlay effect.
The plugin supports five types of animations for the popups. You can choose any of these from the “Animation Type” field and choose the animation speed in the next option.
Then, there are several checkboxes to enable popup stacking, disable popup re-positioning on window resizing, set up the default location, and define the distance from the top edge of the screen.
In the “Z Index” section, you can choose the Z-index options for both the overlay and the popup.
In the “Close Settings” section, you will find various options to manage the closing condition of the popup. You can provide a custom close text, set up the close button to appear after a specific period, allow the visitors to close the overlay by clicking on the overlay, pressing the ESC, or the F4 key.
Setting up the Display Options
Popup Maker offers some advanced display options to help you control exactly where you want to display the popups. You will find the display options in the “Conditions” section located on the right side of the new popup page.

It is possible to display your popup on all posts and pages, on selected posts and pages, selected tags, categories, ID, and so on.
There are three methods to set up the display options –
- Negative Conditions: There is an exclamation icon in the Conditions section. Clicking this icon will activate it. The red icon works as a not button when you don’t want to display the popup. For instance, if you click the icon and choose the home page, the popup will not be displayed on the home page.

- “And” Grouping: This method allows you to display the popup on more than one condition. To use this, add your first condition, and click the “+ AND” button to add the next condition.

- “Or” Grouping: This method is useful when you want to display the popup on either one of multiple conditions. To set this up, create your first condition, and click the “+ OR” button to add the next condition.
There are two dedicated checkboxes to disable the popup on mobile and tablet devices.
Below, there are two more sections. Among these, “Analytics” shows the number of opens for this popup. And the “Theme Settings” section enables you to choose the theme for this popup. There are six different themes for you to choose from.
Once you have configured the display options, click “Publish” to get started with this popup.
Managing the Popups
You can manage all the popups on your website from the Popup Maker > All popups page. The page will provide a list of the existing popups you have on the site.

For each popup, you will find the name, CSS classes, the number of times this popup has been opened, and the title. Hover over the popup title to reveal additional menus like edit, quick edit, and trash. The CSS classes will come in handy to apply custom CSS and override the default styles for the popup.
Editing the Popup Themes
You already know that Popup Maker comes with six ready-made themes. While these look great with the default designs, you can customize them to go with your existing website style.
To do that, go to Popup Maker > Popup Themes. This will take you to a page containing all six themes. Hover over the theme you want to personalize, and click the “Edit” link. This takes you to a page like the following –

As you can see, you have different options to customize the overlay, container, border, drop shadow, title, text shadow, content, and close settings.
There is a handy preview pane on the right side that will change according to your style changes. Click “Update” once you have made the necessary changes.
Popup Maker Settings Options
Go to Popup Maker > Settings to manage the available configuration options. The page contains several options to stop loading the Google Fonts, avoid using the default stylesheet, enable the debug mode, disable the open tracking feature, and so on.
Final Words
And that’s how you use the Popup Maker plugin to set up and display popups on your WordPress site. Despite being a free plugin, it comes with several powerful options to help you manage, customize, and control the popups.
So, what do you think about the plugin? Are you going to use this to create popups on your WordPress site? Let me know in the comments below.


