How to Set Up Yoast SEO for WordPress
Yoast SEO is probably the most popular SEO plugin for WordPress. It comes with all the necessary options to help you optimize your website and the content to get better search engine ranking. In today’s tutorial, I am going to show you how to set up Yoast SEO on your WordPress site for the best results.
Once you install and activate the plugin, you will notice a new menu item titled “SEO” in the admin menu. This is where you will find most of the SEO options.
Exploring the Dashboard
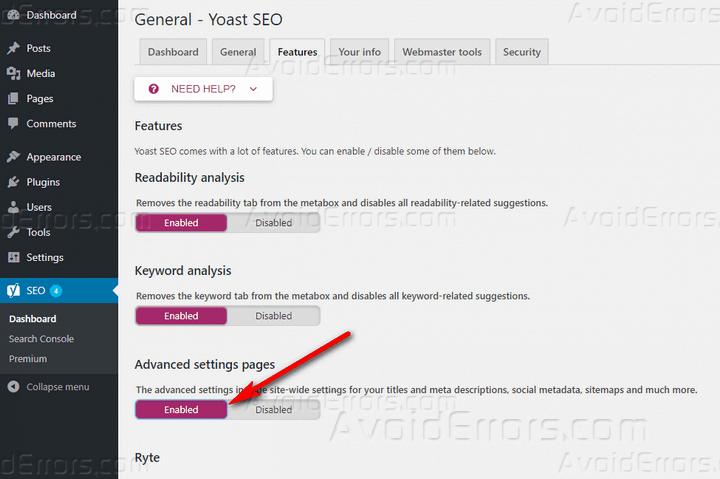
The default plugin settings will hide the advanced options. To show these options, go to SEO > Dashboard, select the “Features” tab, and enable the “Advanced settings pages” option. Click “Save changes,” and now you will see the full list of options under the SEO menu.
Back to the dashboard, you will find a list of the existing SEO problems and notifications for your site.
Managing the Titles & Metas
You can configure the titles and meta descriptions of your website from the SEO > Titles & Meta page. The page is divided into several tabs. In the “General” tab, you can choose the title separator that will be displayed between the post title and your website name.

In “Homepage,” you can define the templates for the title and meta description. “Post Types” allow you to do the same for posts, pages, and media files. However, it is always better to provide unique titles and meta descriptions for your posts and pages from the post editor.
“Archives” includes an option to enable or disable author archives. You should disable this for single-author blogs. The rest of the options can be left as they are.
Click “Save changes” to save and apply the changes you have made.
The Social Options
Yoast SEO makes it a lot easier to integrate your website with various social media networks. Go to SEO > Social to configure these options.
In the “Accounts” tab, provide the URL for your various social media accounts, and the plugin will inform the search engines that these profiles are associated with this website.

The “Facebook” tab will have the Open Graph enabled by default, which is fine. Below, in the “Frontpage settings” area, you can provide the image and define the title and description for your home page. Facebook will use these details when someone shares your website address.
In “Default settings,” you can provide a fallback image that will be used for any content that doesn’t have a featured image.
“Twitter” will have the Twitter card enabled by default, which is also fine. You can choose to use any of the two available card types –
- Summary or
- Summary with a large image.
You will also find dedicated tabs for configuring the Pinterest and Google+ sharing options for your content.
As always, make sure you are tapping the “Save changes” button to apply all these changes.
Dealing with the XML Sitemap
Having a sitemap is very important for any modern website. The sitemap helps the search engines to crawl and collect information from your website in a better way. You will find the sitemap options in the SEO > XML Sitemaps page.

First of all, make sure that “XML sitemap functionality” is enabled. In the “User sitemap” tab, disable the author/user sitemap. In “Post Types” and “Taxonomies,” select what type of content and taxonomies you want to include in the sitemap.
Finally, click “Save changes” to apply the changes you just have made.
The Advanced Options
Go to SEO > Advanced to check out the advanced features. There are three tabs in this section.
Breadcrumbs
Here, you can enable or disable breadcrumbs for your website. You will also find dedicated options to select the separator, add a prefix, bold the last page, and so on.
Permalinks

This section offers some handy options like removing the “/category/” part from the category URLs, redirecting attachments to the original post, automatically removing stop words from post URLs, etc.
RSS
In this section, you can add links to your RSS content so that Google and other search engines can understand that you are the original source of this content.
Using the Available Tools
Yoast SEO also offers some additional tools that you can find in the SEO > Tools page. Among these, “Bulk Editor” enables you to change the titles and meta descriptions for multiple pieces of content at once. “File Editor” allows you to apply quick changes to the robots.txt and .htaccess files.
So far, you have made quite a few changes. Therefore, it makes sense to keep a backup of these settings. You can do that from the “Import and Export” option. It also allows you to bring settings from other websites.
Using the Post Options
Yoast will add some new features to your regular post editor. Go to Posts > Add New, and you will find these new features in the “Yoast SEO” section.

There are two tabs –
- Readability and
- Focus Keyword
Among these, Readability will inform you about the reader-friendliness of your text. For example, you will get alerts if any of your sub-heading is followed by more than 300 words, the percentage of transition words, the Flesch Reading Ease test score, average paragraph length, lengthy sentences, the amount of passive voice, and so on.
Click on the eye icon right next to each problem to identify the relevant sections in the post editor.
Focus Keyword allows you to provide the primary target keyword for the page. You will also get a snippet preview of the article in the search engine result page. Click the “Edit snippet” button to edit the title, slug, and meta description.
In the “Analysis” tab below, you will find information about the focus keyword, meta description, image, internal linking, outbound links, number of words, title length, and so on.
Final Words
Yoast SEO comes with so many options that you may find it a bit challenging to set it up correctly. Now that you have read this detailed tutorial, you know the proper ways to set up the plugin and enjoy better search engine ranking for your website.
Let me know if you have any other confusion about using Yoast SEO. I will be glad to clear your confusions.


