How to Use Slider Revolution to Create Amazing Sliders
Having an attractive slider is a must for any modern website. The slider makes your site look more attractive, keeps the visitors engaged, and enables you to highlight your latest products, services, or promotions in front of potential customers.
But how do you create a slider on your website?
That is what I will discuss today. Below, I will show you how to use Slider Revolution to create some amazing sliders for your WordPress site.
Since this is a premium plugin, you need to purchase it from CodeCanyon. Once you install and activate the plugin, you will notice a new menu item titled “Slider Revolution” on the dashboard menu.
Creating a New Slider with Revolution Slider
To create a new slider, go to the “Slider Revolution” menu, and click the “New Slider” icon. This opens a page with all the necessary options to create and edit your slider.

As the page is divided into several sections, I will go through these one at a time. Let’s get started with the first one –
Content Source
This section enables you to choose the content source for your slider. For regular sliders, you should stick to the “Default Slider” option. Other available options allow you to display a slider containing posts or pages from your website, the popular or recent posts, WooCommerce products, etc.

It is also possible to create slideshows with images or videos from various third-party sources like Flickr, Instagram, Twitter, Facebook, YouTube, and Vimeo.
For this tutorial, I will choose “Default Slider,” and add custom images to the slides.
Slider Title & Shortcode
This is the section where you can provide a title and alias for the slider. Neither of these will be displayed to the visitor. Keep in mind that the alias cannot contain any space or special characters.
Select a Slider Type
Slider Revolution comes with three slider types –
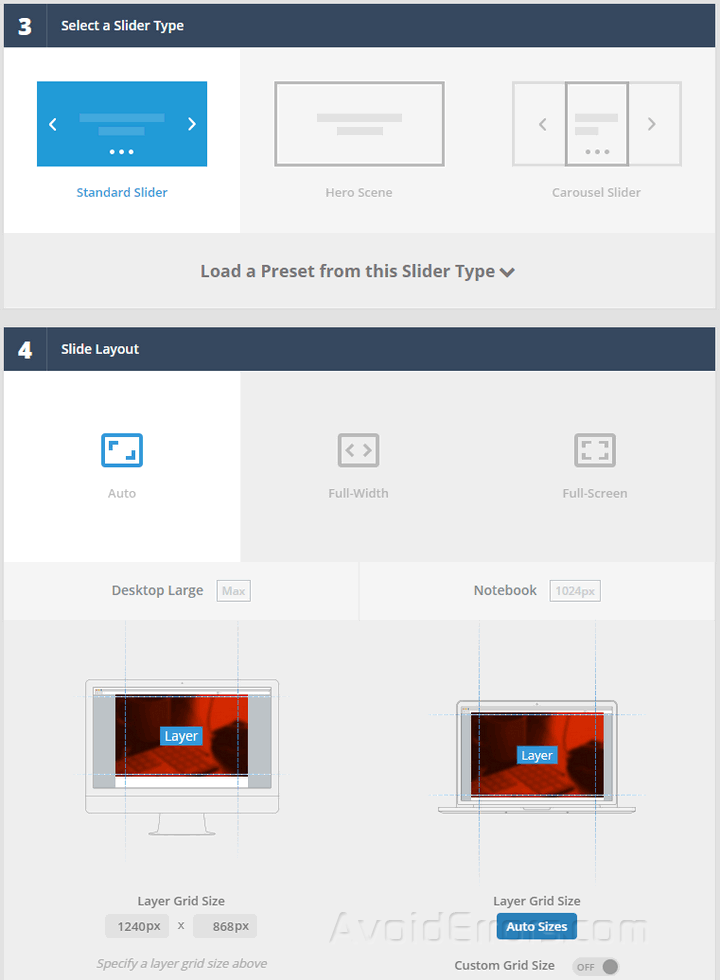
- Standard Slider: This is the regular slider you see on most websites.
- Hero Scene: This is the full-width image that will be displayed when the website loads for the first time.
- Carousel Slider: This slider type allows you to display a small slideshow without taking up too much space.
Choose your desired slider type, and click the “Load a Preset from this Slider Type” button. This will show all the available presets for the slider type. Click on the preset you want to use, and it will load automatically.
Slide Layout
Finally, in the “Slide Layout” section, you can choose the layout for the slider. There are three options for you – auto, full-width, and full-screen. As you choose the layout, the screen resolutions will automatically change for the desktop, tablet, and mobile versions.
Customize, Build & Implement
This section offers several shortcuts to set up the slider options, edit slides, and embed the slider on your website. Let’s get started with the slider options.
Setting up the Slider Options
Now that you have created your first slider, it’s time to set up the options for your slider. You will find the slider options in the right column.

As you can see, the settings options are divided into several sections. Among these, “General Settings” includes regular options like stopping slider on hover, enabling random mode, activate the progress bar, and so on.
Then, “Layout & Visual” allows you to customize the slider background, loading spinner, mobile behaviors, and set the slider position.
In “Navigation,” you can choose what type of navigation you want to use for the slider. The available options include arrows, bullets, tabs, thumbs, and touch.

“Parallax & 3D” allows you to enable or disable Parallax effects. If enabled, you can define the mouse sensibility and set the parallax levels.
Lastly, “Scroll Effects” enables you to activate the fade, blur, or grayscale effects. It is also possible to enable or disable the effects for specific elements.
Once you have made the necessary changes, click the “Save Settings” button to save the changes.
Editing the Slides
So far, you have created the slider and set up the options. Now, it’s time to add slides. To do that, click the “Slide Editor” button at the top of the page. This will open a page like the following –

In the “Main Background” section, choose the “Media/Background” option. Select the image you want to show on the slide. You will find lots of additional options to choose the image size, provide the alt, title text, configure background properties, apply any of the available filters, enable Ken Burns effect, and so on.
The “General Settings” section enables you to define the slide duration, hide the slide on mobile devices, and set up a specific period when the slide will be visible.
In “Slider Animation,” you will find a wide variety of animations including fade, slide, fade & slide, parallax, zoom transition, curtain transition, filter transitions, etc. Each animation will have multiple varieties to choose from. Hovering over each effect will play a preview of the animation.

In the “Link & SEO” section, you can add a custom CSS class, ID, and a custom URL to the slide.
Once you have configured the slide, click the “Add Slide” button to add a new slide. Repeat the steps described above to add as many slides as you want.
Finally, click the save button to save your slider. Now you are ready to publish the slider on your website.
Displaying the Slider
Slider Revolution makes it very easy to show a slider on your website. First of all, click on the Slider Revolution menu to go to the sliders list. Find out your desired slider, and click the down arrow to reveal the admin options. Choose the “Embed Slider” option from the drop-down menu.

This will open a pop-up with the embed code for the slider. You can use this embed code to display the slider on any post, page, or custom post type. Copy and paste the code into the content editor. Make sure you are in the text mode inside the editor, it won’t work in the visual mode.
The plugin also comes with a custom widget to help you display the slider on the sidebar. You will find the widget in the Appearance > Widgets page. Just drag the “Slider Revolution” widget to your desired location, choose the slider you want to display, and click “Save.”
Final Words
And that’s how you create a gorgeous slider with Slider Revolution. Now that you have read this step-by-step tutorial, you should be confident in creating, managing, and displaying beautiful-looking sliders on your WordPress site. Let me know if you need any more help. I will be glad to help you out.


