Turn Your Mini PC into a Personal Cloud Storage
I recently installed Ubuntu 18.04 LTS on a mini PC, I decided why don’t we install OwnCloud and use this mini PC as a free cloud storage server.
OwnCloud is free robust open source software that allows you to set up your own cloud syncing, like Dropbox and Onedrive cloud storage, and other cloud storage services out there, unlike the other cloud storage services, OwnCloud is free to use.
A. First of all, back up your data! Make sure to backup your documents (and other important files, such as videos, music, and so forth).
B. Create a bootable Ubuntu USB installation. Here I installed the 12.04 version but the same applies to the latest version of Ubuntu. In the video tutorial I created the bootable USB with Rufus but the point is to create a bootable USB.
C. Then Boot from the Ubuntu installation USB. Here is a video tutorial that will help.
Once we have Ubuntu fully installed this tutorial shows everyone the necessary steps to install and configure OwnCloud on Ubuntu 18.04 LTS Desktop in your home environment.
To get started with installing OwnCloud, follow the steps below:
Install Apache2 HTTP Server
Install Apache2 on Ubuntu by running the following commands:
sudo apt install apache2
After installing Apache2, run the commands below to disable directory listing.
sudo sed -i "s/Options Indexes FollowSymLinks/Options FollowSymLinks/" /etc/apache2/apache2.conf
After install Apache2, the commands below can be used to stop, start and enable Apache2 service to always start up with the server boots.
sudo systemctl stop apache2.service
sudo systemctl start apache2.service
sudo systemctl enable apache2.service
Install MariaDB Server
To install MarisDB run the commands below.
sudo apt-get install mariadb-server mariadb-client -y
The commands below is use to stop, start and enable MariaDB service to always start up when the server boots.
sudo systemctl stop mariadb.service
sudo systemctl start mariadb.service
sudo systemctl enable mariadb.service
After that, run the commands below to secure MariaDB server.
sudo mysql_secure_installation
When prompted, answer the questions below by following the guide.
- Enter current password for root (enter for none): Just press the Enter
- Set root password? [Y/n]: Y
- New password: Enter password
- Re-enter new password: Repeat password
- Remove anonymous users? [Y/n]: Y
- Disallow root login remotely? [Y/n]: Y
- Remove test database and access to it? [Y/n]: Y
- Reload privilege tables now? [Y/n]: Y
Restart MariaDB server
sudo systemctl restart mariadb.service
Install PHP and Related Modules
Run the commands below to add a third party repository and upgrade to PHP 7.1
sudo apt-get install software-properties-common -y
sudo add-apt-repository ppa:ondrej/php
Then update and upgrade to PHP 7.1
sudo apt update
Run the commands below to install PHP 7.1 and related modules..
sudo apt install php7.1 libapache2-mod-php7.1 php7.1-common php7.1-mbstring php7.1-xmlrpc php7.1-soap php7.1-apcu php7.1-smbclient php7.1-ldap php7.1-redis php7.1-gd php7.1-xml php7.1-intl php7.1-json php7.1-imagick php7.1-mysql php7.1-cli php7.1-mcrypt php7.1-ldap php7.1-zip php7.1-curl -y
After install PHP 7.1, run the commands below to open FPM PHP default file.
sudo nano /etc/php/7.1/apache2/php.ini
Then make the change the following lines below in the file and save.
file_uploads = On
allow_url_fopen = On
memory_limit = 256M
upload_max_filesize = 100M
display_errors = Off
date.timezone = America/Florida
Create OwnCloud Database
Now that you’ve install all the required packages, continue to start configuring the server.
To connect to MariaDB server, run the commands below.
sudo mysql -u root -p
Then create a database called owncloud
CREATE DATABASE owncloud;
Create a database user called ownclouduser with new password
CREATE USER 'ownclouduser'@'localhost' IDENTIFIED BY 'password_here';
Then grant the user full access to the database.
GRANT ALL ON owncloud.* TO 'ownclouduser'@'localhost' IDENTIFIED BY 'password_here' WITH GRANT OPTION;
Now, save your changes and exit.
FLUSH PRIVILEGES;
EXIT;
Download Latest OwnCloud Release
Download and and extract OwnCloud files into its root directory:
cd /tmp && wget https://download.owncloud.org/community/owncloud-10.0.8.zip
unzip owncloud-10.0.8.zip
sudo mv owncloud /var/www/html/owncloud/
Then run the commands below to set the correct permissions for OwnCloud to function.
sudo chown -R www-data:www-data /var/www/html/owncloud/
sudo chmod -R 755 /var/www/html/owncloud/
Configure Apache2
Configure Apahce2 site configuration file for OwnCloud. This file will control how users access OwnCloud content. Run the commands below to create a new configuration file called owncloud.conf
sudo nano /etc/apache2/sites-available/owncloud.conf
Then copy and paste the content below into the file and save it. Replace the highlighted in red lines with your own domain name and directory root location.
<VirtualHost *:80>
     ServerAdmin [email protected]
     DocumentRoot /var/www/html/owncloud/
     ServerName avoiderrors.com
     ServerAlias www.avoiderrors.com

     Alias /owncloud "/var/www/html/owncloud/"

     <Directory /var/www/html/owncloud/>
        Options +FollowSymlinks
        AllowOverride All
        Require all granted
          <IfModule mod_dav.c>
            Dav off
          </IfModule>
        SetEnv HOME /var/www/html/owncloud
        SetEnv HTTP_HOME /var/www/html/owncloud
     </Directory>

     ErrorLog ${APACHE_LOG_DIR}/error.log
     CustomLog ${APACHE_LOG_DIR}/access.log combined

</VirtualHost>
Save the file and exit.
Enable the OwnCloud and Rewrite Module
After configuring the VirtualHost above, enable it by running the commands below
sudo a2ensite owncloud.conf
sudo a2enmod rewrite
sudo a2enmod headers
sudo a2enmod env
sudo a2enmod dir
sudo a2enmod mime
Restart Apache2
To load all the settings above, restart Apache2 by running the commands below.
sudo systemctl restart apache2.service
Access Owncloud from the LAN
To access ownCloud from inside the network, We need to know the IP address of the owncloud server and use it to access it by placing it in the search bar as follows:
1. Open the terminal and enter the following command:
ifconfig

2. Locate the IP address of the Ubuntu server, it should look something like: 192.x.x.x or 10.x.x.x
3. Place your LAN IP in the address bar like this:
http://LANIP/owncloud
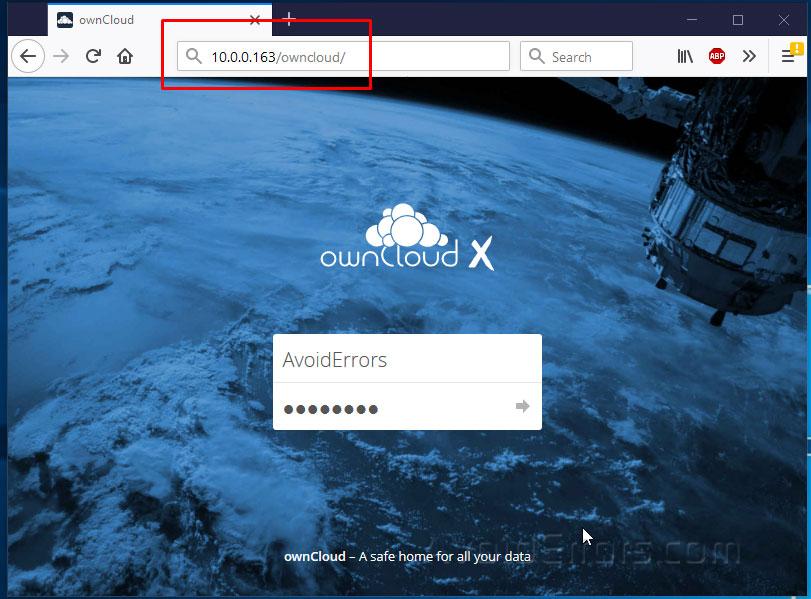
4. You should then see OwnCloud setup page. You’ll be prompted to create admin account and password. Connect to the database using the information you created and continue.
If you left it default then it should look like the image below:

Click on Finish setup to finish installing Owncloud on Ubuntu 18.04 LTS
Enable SSL for Secure External Access
This process only applies if you are planning on connecting to the ownCloud from the WAN (outside the network) using mobile devices or tablet. Enable and configure SSL on Owncloud:
1. Open the terminal and run the following command:
sudo a2enmod ssl
2. Create a new directory for the self signed certificate:
sudo mkdir /etc/apache2/ssl
3. Create the self signed certificate and the server key that protects it, and placing both of them into the new directory:
sudo openssl req -x509 -nodes -days 365 -newkey rsa:2048 -keyout /etc/apache2/ssl/owncloud.key -out /etc/apache2/ssl/owncloud.crt
Note: The above certificate is valid for 365 days. We have mentioned validity days in the command.
4. Now we need to setup the certificate:
sudo nano /etc/apache2/sites-available/default-ssl.conf
5. The lines that need changing are the following:
ServerName IP :443
SSLEngine on
SSLCertificateFile /etc/apache2/ssl/owncloud.crt
SSLCertificateKeyFile /etc/apache2/ssl/owncloud.key

6. Activate the new virtual host
sudo a2ensite default-ssl
7. Restart apache
sudo service apache2 restart
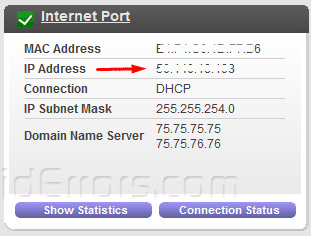
Port Forward for External Access
Log into your router and get the WAN IP address:
Now we need to add the WAN IP to your trusted IP list and not to be overwritten by ownCloud. To do this open the Owncloud config file, enter:
sudo nano /var/www/html/owncloud/config/config.php
Here add the WAN IP (External IP address) you just got from the router to the trusted domains array. Your new entry should look something like this:
1 => 'xxx.xxx.xxx.xxx',
X are just placeholders. Replace the X’s with the WAN IP Address.
Now update the URL of the overwrite.cli.url line with your WAN IP Address. It should look something like this:
‘overwrite.cli.url’ => ‘https://xxx.xxx.xxx.xxx/owncloud’,
Here is an example of the completed config.txt file.
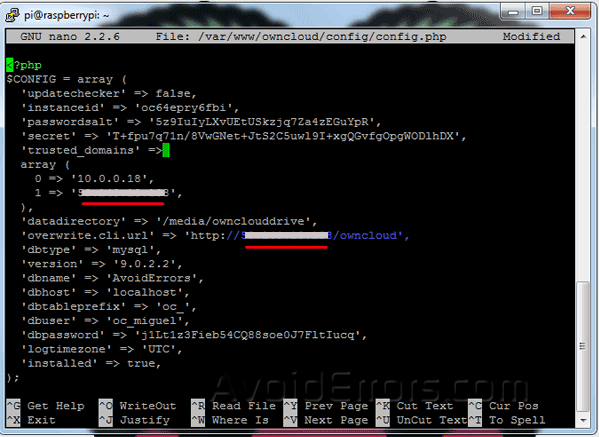
Hidden is the WAN IP. Once done save and exit.
Log back into your router and navigate to the port forward section.
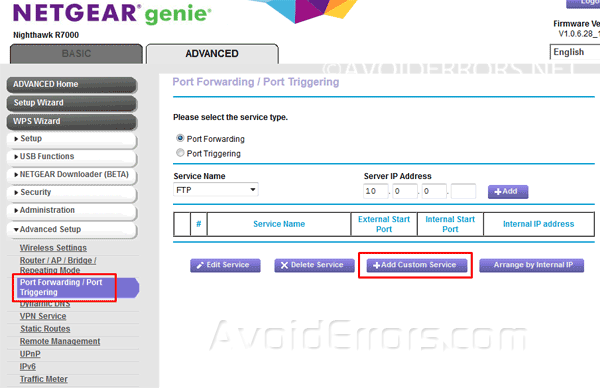
Now port forward SSL port 443 to the Ubuntu server runnung ownCloud instance internal IP (LAN IP) address and save settings.

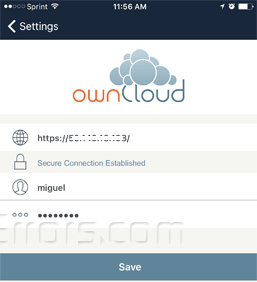
Now your ownCloud is ready to be accessed externally (WAN) and from your devices just download the ownCloud App and enter: “https:// WAN IP Address” on the address bar or devices. below is an example: