Install ownCloud 10 on Raspberry PI 3 with Raspbian Installed
Our goal is to install ownCloud 10 on the Raspberry pi with Raspbian installed. We are not just installing ownCloud but also mounting an external drive for lager capacity of data storage and to be able to access it from anywhere in the world with internet access.
If you don’t have a Raspberry PI I would personally recommend buying the Raspberry pi-3 kit with a 32 GB Micro SD card so that you don’t have to mount an external drive. unless you want to store more than 32GB of data.
If you haven’t installed Raspbian then check out my guide on How to install Raspbian.
Video Tutorial:
Setting up Raspberry Pi for ownCloud Server
1. Turn on the Raspberry Pi. From the terminal or SSH enter the following command:
sudo raspi-config
The following changes needs to be made in the Raspberry Pi configuration:
A. Change user password
“For Security when accessing form the WAN”
B. Change locale to en_US.UTF8
Select “Localisation Options” –> “Change Locale”
Then Finish, and auto reboot. Upon re-boot you would need to update the RPI and its packages.
Update the Raspberry Pi and its packages
sudo su
apt update && apt upgrade
Install Apache 2 and SQLite
sudo apt-get install apache2 sqlite
sudo service apache2 restart
Install PHP
sudo apt-get install php php-gd php-sqlite3 php-curl libapache2-mod-php
Install SMB Client
sudo apt-get install smbclient
PHP extensions needed to use ownCloud
sudo apt-get install php-mysql php-mbstring php-gettext php-intl php-redis php-imagick php-igbinary php-gmp php-curl php-gd php-zip php-imap php-ldap php-bz2 php-phpseclib php-xml
Register ownCloud trusted key
wget -nv https://download.owncloud.org/download/repositories/production/Debian_9.0/Release.key -O Release.key
sudo apt-key add - < Release.key
Add the official ownCloud package repository to Raspbian
echo 'deb http://download.owncloud.org/download/repositories/production/Debian_9.0/ /' > /etc/apt/sources.list.d/owncloud.list
apt-get update
Enable the Apache mod_rewrite module
sudo a2enmod rewrite
systemctl restart apache2
Install Maria Database
sudo apt install mariadb-server mariadb-client
Configure the database and user:
mysql -u root -p
You’ll be prompted to enter the Pi user password. Then execute the underneath commands in blue:
MariaDB [(none)]> create database owncloud;
Query OK, 1 row affected (0.00 sec)
MariaDB [(none)]> create user owncloud@localhost identified by ‘12345’;
Query OK, 0 rows affected (0.00 sec)
MariaDB [(none)]> grant all privileges on owncloud.* to owncloud@localhost identified by ‘12345’;
Query OK, 0 rows affected (0.00 sec)
MariaDB [(none)]> flush privileges;
Query OK, 0 rows affected (0.00 sec)
MariaDB [(none)]> exit;
Bye
Dowload and Install ownCloud
wget https://download.owncloud.org/community/owncloud-10.8.0.zip
Once downloaded, unzip the zipped package to the /var/www/ directory.
unzip owncloud-10.8.0.zip -d /var/www/
Set permissions
chown -R www-data:www-data /var/www/owncloud/
chmod -R 755 /var/www/owncloud/
Configure Apache
Edit the Apache default site configuration file
sudo nano /etc/apache2/sites-enabled/000-default.conf
Change DocumentRoot /var/www/html to DocumentRoot /var/www/owncloud
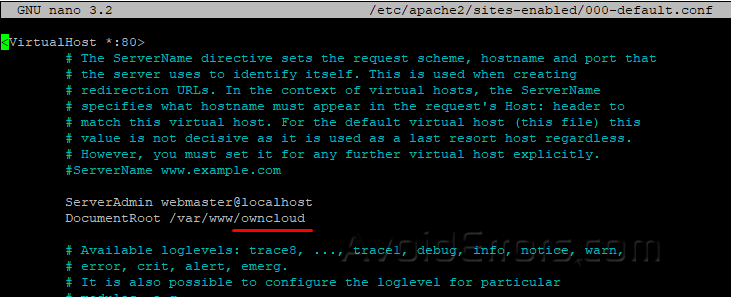
Then save and exit
Restart apache:
sudo systemctl restart apache2
Create data directory for ownCloud
sudo mkdir /media/data
sudo mkdir /media/data/owncloud
Change owner and group permissions to www-data
sudo chown www-data:www-data -R /media/data/owncloud
Basic First Access Setup
Get the IP from the Raspberry pi
ifconfig
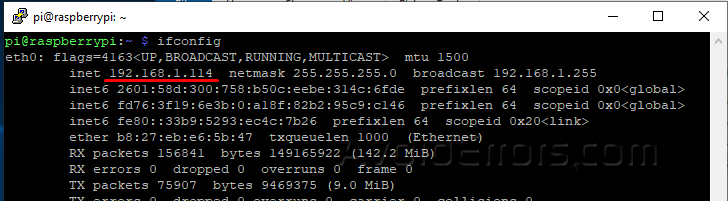
1. Open your browser and enter the IP address provided, in my case is 192.168.1.114 you’ll be directed to your ownCloud storage server.
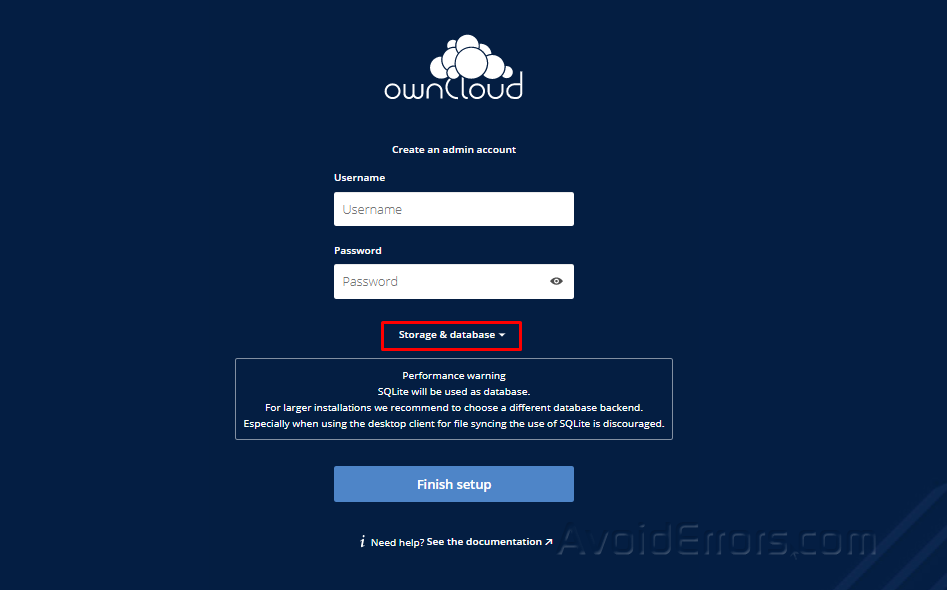
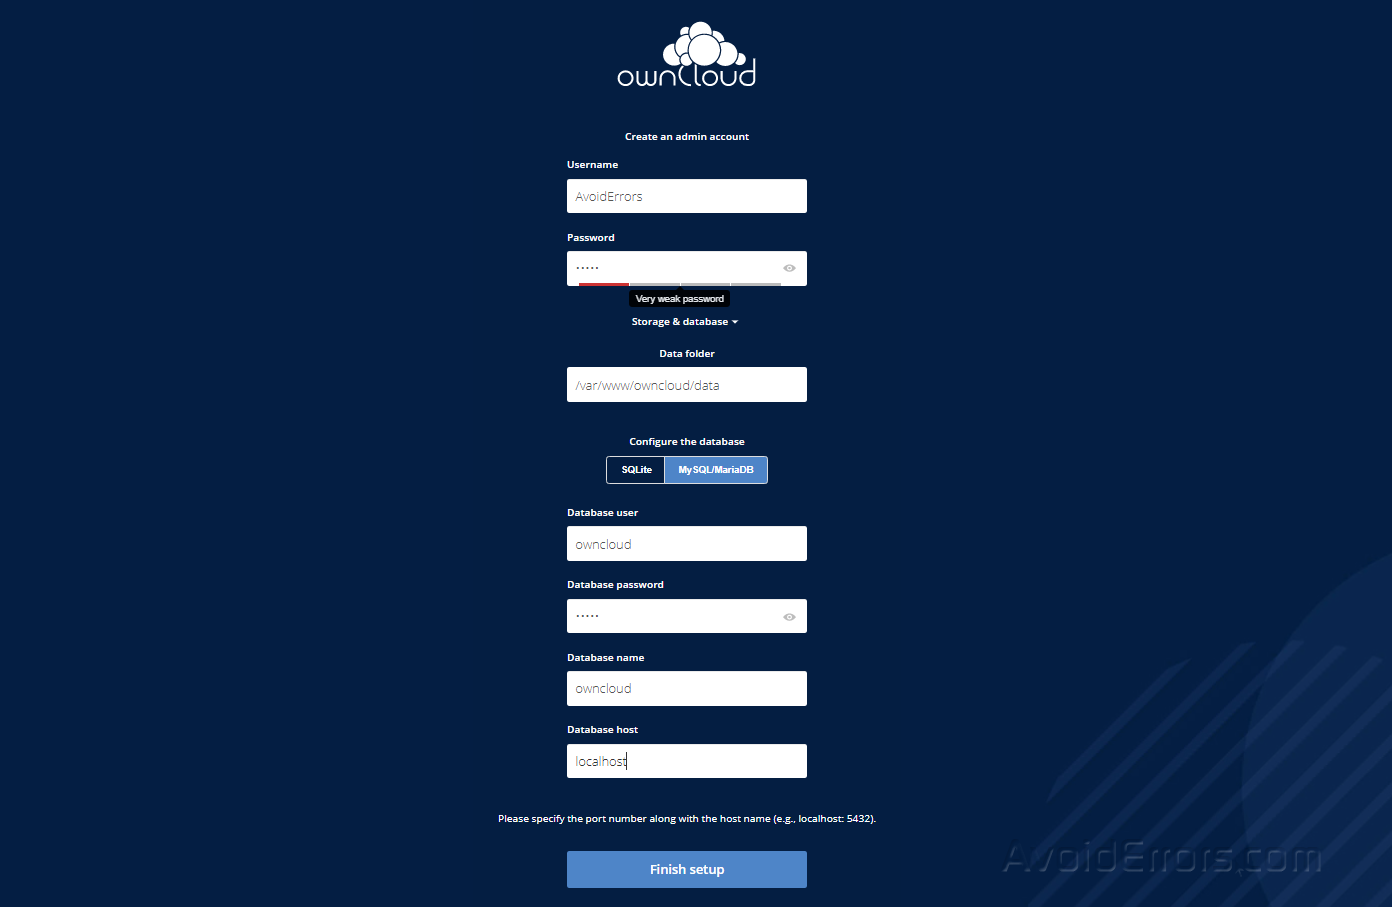
2. You should be presented with a simple setup screen, Here create a username and password to create an admin account.
3. Click on Storage & database drop-down and enter your external hard drive directory: /media/data/owncloud
4. Immediately underneath enter your Mariadb details as follow:
Username: owncloud
Password: 12345
Database: owncloud
Server: localhost
5. Click on ‘Finish Setup’ button. That’s it. We’re good to go. Owncloud 10 installed on Raspbian Stretch is now ready for use.
Done! !! all is left is to configure your devices to access your ownCloud storage.
Mounting and Setting up an external hard drive
These instructions are for mounting an NTFS formatted hard drive and allowing ownCloud to store files onto it. Now would be a good time to plug in the external Hard Drive to the RPI.
1. Having an NTFS drive we will need to install a NFTS package by entering the following:
sudo apt-get install ntfs-3g -y
2. Make a directory we can mount to:
sudo mkdir /media/ownclouddrive
3. Create and add the www-data user to the www-data group:
sudo groupadd www-data
sudo usermod -a -G www-data www-data
4. Make the user www-data owner of the mounted drive and make its permissions read, write and execute:
sudo chown -R www-data:www-data /media/ownclouddrive
sudo chmod -R 775 /media/ownclouddrive
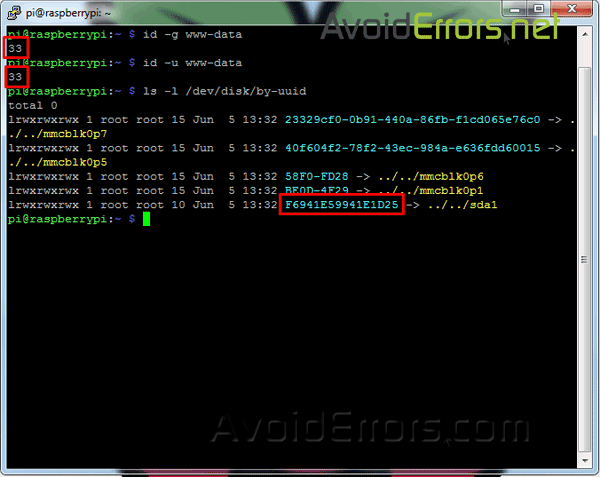
5. Now we need to get the gid, uid and the uuid as we will need to use them so the pi will remember it even if we plug it into a different USB port. Enter the following command for the gid:
id -g www-data
6. Now to get the uid enter the following command:
id -u www-data
7. Also we meed to get the UUID of the attached external hard drive so the Pi can remember this drive even if you plug it into a different USB port.
ls -l /dev/disk/by-uuid
8. Then copy the light blue letters and numbers of the sda1 entry usually located on the bottom. Should look something like (numbers&letters -> ../../sda1). See picture below:
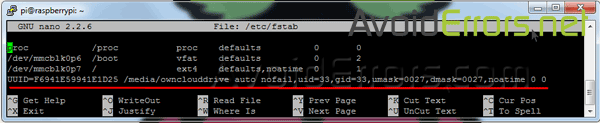
9. Now add your drive into the fstab file so it’ll boot with the proper permissions.
sudo nano /etc/fstab
10. Add the following line to the bottom of the file, updating uid, guid and the UUID with the values we got above. (It should all be a single line). Dont forget to replace the UUID number to yours in stead of the one you copied from here.
UUID=F6941E59941E1D25 /media/ownclouddrive auto nofail,uid=33,gid=33,umask=0027,dmask=0027,noatime 0 0
11. Save and reboot the Raspberry Pi:
sudo reboot
12. Now the drives should automatically be mounted. If mounted we’re all good to go. To check it enter:
sudo ls /media/ownclouddrive

If there are files inside the drive you should be able to see them here. If it’s an empty drive you might not see anything so don’t be surprise if nothing shows up.
If you want to be absolutely positive that the drive is properly mounted, unplug the drive from the RPI plug it onto a PC since the drive is formatted “NTFS” it should be easily detected by the PC, open it, create an txt file name it test, then eject it and plug it back to the RPI and run the following command:
sudo ls /media/ownclouddrive
The txt file you created should be there.
Basic First Access Setup
1. Open your browser and enter the IP address provided, in my case is 192.168.1.140/owncloud you’ll be directed to your ownCloud storage server.
2. You should be presented with a simple setup screen, Here enter a username and password to create an admin account.
3. Click on Storage & database dropdown and enter your external hard drive directory: /media/ownclouddrive (Skip this if you didn’t setup an external drive).
4. Immediately underneath enter your MySQL details as follow:
Username: owncloud
Password: 12345
Database: owncloud
Server: localhost
5. Click on ‘Finish Setup’ button. That’s it. We’re good to go. Owncloud 10 installed on Raspbian Stretch is now ready for use.

Done! !! all is left is to configure your devices to access your ownCloud storage.
External Access
To allow devices like your phone or tablet to access your cloud from anywhere in the world with internet access you must enable SSL then enable port forward:
Port Forward
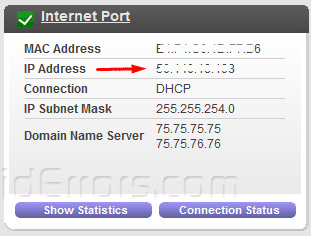
Log into your router and get the WAN IP address:
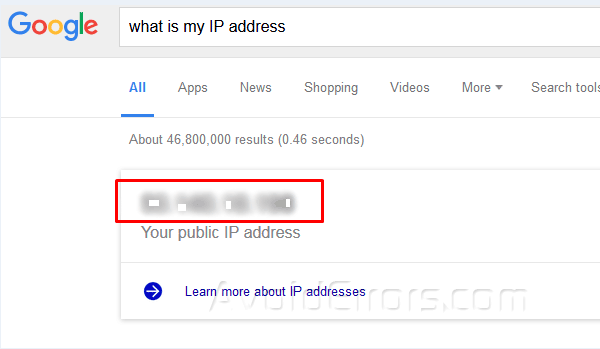
Or Google what is my IP address?
Now we need to add the WAN IP to your trusted IP list and not to be overwritten by ownCloud. To do this open the Owncloud config file, enter:
sudo nano /var/www/html/owncloud/config/config.php
Here add the WAN IP (External IP address) you just got from the router or Google to the trusted domains array. Your new entry should look something like this:
1 => 'xxx.xxx.xxx.xxx',
X are just placeholders. Replace the X’s with the WAN IP Address.
Now update the URL of the overwrite.cli.url line with your WAN IP Address. It should look something like this:
'overwrite.cli.url' => 'https://xxx.xxx.xxx.xxx/owncloud',
Here is an example of the completed config.txt file.
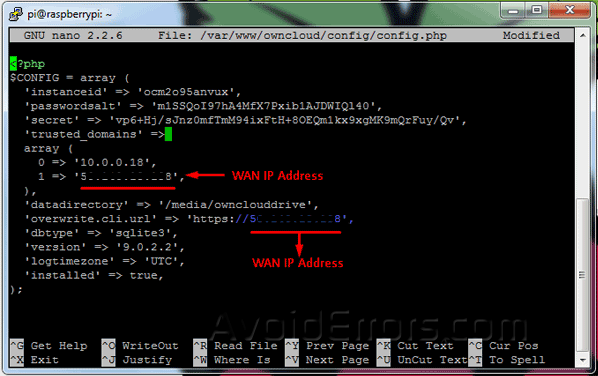
Once done save and exit the the config.php.
Now log into your router and navigate to the port forward section.
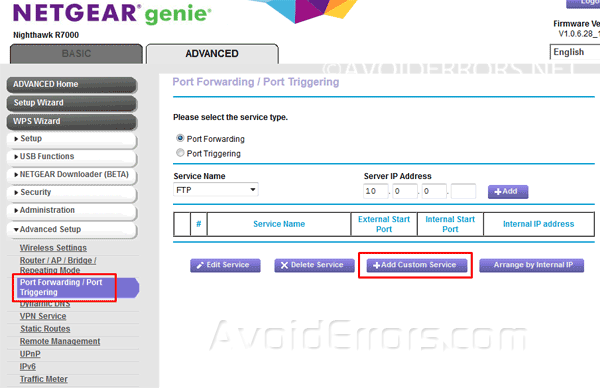
Port forward SSL port 443 to the Raspberry pi internal IP (LAN IP) address and save settings.

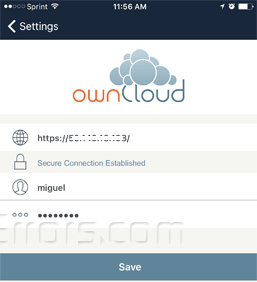
Now your RPI ownCloud is ready to be accessed externally (WAN) and from your devices just download the ownCloud App and enter: “https:// WAN IP Address” on the address bar or devices. below is an example:
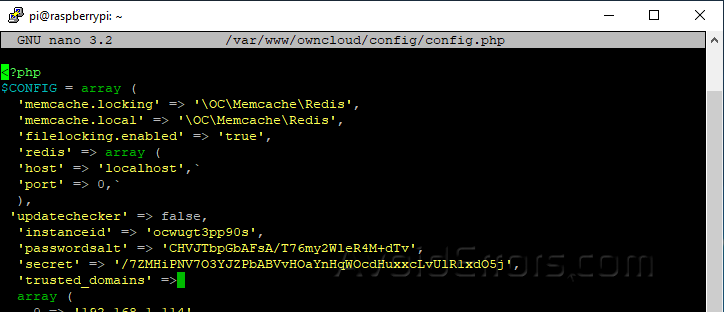
Install Redis Memory Caching
Fix “No memory cache has been configured. To enhance your performance please configure a memcache if available. Further information can be found in our documentation.
Please double check the installation guides, and check for any errors or warnings in the log.”
sudo su
Edit config.php:
sudo nano /var/www/owncloud/config/config.php
add the following:
'memcache.locking' => '\OC\Memcache\Redis',
'memcache.local' => '\OC\Memcache\Redis',
'filelocking.enabled' => 'true',
'redis' => array (
'host' => 'localhost',`
'port' => 0,`
 ),


hi ! i’m a beginner in raspberry and i’ve got a probleme at this step:
MariaDB [(none)]> create user owncloud@localhost identified by ‘12345’;
ERROR 1064 (42000): You have an error in your SQL syntax; check the manual that corresponds to your MariaDB server version for the right syntax to use near ‘‘12345’’ at line 1
and i don’t know how to solve this :/
Thanks for this tutorial!
Manually enter the command in blue in stead of copying and pasting
Hi.. I need ur help
I can’t setup ssl
Plzz help me
where are you stuck?
Apache2 server r not restarting
Can u send me mail
[email protected]
Plzz
Miguel, Thank you for the easy setup. I do have one question. Can you add external storage after install.
yes
Hello Miguel,
Thnaks you for the very easy setup video. I do have one question. Can you configure /add an external drive if you have setup to use internal storage?
Thanks!
Chip
yes. when you decide to use an external Drive, you would need to go through the mounting a directory process and change the path. run this command in the terminal:
sudo nano /var/www/html/owncloud/config/config.php
or
sudo nano /var/www/owncloud/config/config.php
and change the datadirectory to /media/owncloud
then move your owncloud data:
sudo mv /var/www/html/owncloud/data /media/owncloud
or
sudo mv /var/www/owncloud/data /media/owncloud
then restart
sudo service apache2 restart
or
sudo apache2 restart
Hi Miguel..i’m a beginner in raspberry. Please help me have got a problemes. how to fix this step:Transactional file locking should be configured to use memory-based locking, not the default slow database-based locking
And
You are accessing this site via HTTP. We strongly suggest you configure your server to require using HTTPS instead as described in our security tips.
And
How can I acces anywhere in the world with internet access..
Thanks for those tutorial
Hello Miguel,
Thank you very much for a wonderful tutorial, and accompanying video (with a very calm and level delivery!)
I am totally indebted to you for the fact that, with your help, I have owncloud running beautifully on my Raspberry Pi 3, but I have one last question.
I set everything up with a small USB stick, that I had laying around, and all is good, I want to purchase a powered external hard-drive but wanted to know if is possible to keep the USB stick and add the (yet to be bought) HDD as well?
would I need to run the whole mounting a directory process then add the UUID number to fstab? or will this be problematic… and would it be best to simply remove the USB stick and start again with the (new) HHD?
Many thanks mate, you’re the best.
Hi Kieran, yes, is possible to keep the USB stick and add the (yet to be bought) HDD as well.
yes, you would need to run the whole mounting a directory process then add the NEW UUID number to fstab. just add the same line immediately underneath with the new one.
if you are planning on using the new HDD for owncloud data then you would need to move the owncloud files to the new directory once mounted.
sudo nano /var/www/html/owncloud/config/config.php
or
sudo nano /var/www/owncloud/config/config.php
and change the datadirectory to /new/directory
then move your owncloud data:
sudo mv /var/www/html/owncloud/data /new/directory
or
sudo mv /var/www/owncloud/data /new/directory
/new/directory being the HDD directory you mounted
then restart
sudo service apache2 restart
or
sudo apache2 restart
Hi Miguel.. Plzz reply
Plzz help me
I followed all the steps, put an pendrive for more storage and I recive this when i try to create de admin acount
Error while trying to create admin user:
Failed to connect to the database: An exception ocurred in driver:
SQLSTATE[HYT000][1045]Acces denied for user ‘owncloud’@’localhost’ (using password:YES)
did you set up the password to be yes or 12345 as specified in the video?
I changed the pass in the two code lines.
How can i view the database created?
I removed the database and create a new one. Creating the new database without any problem, but when i went to create the user with the following command “”create user owncloud@localhost identified by ‘12345’;””, the program returned an error.
I think that i will do all the steps again using an external HHD.
I wil post if a do it properly.
I did it again, and it works.
Hi, need some help here,
I understand that I must allow my WAN IP address to access owncloud from anywhere in the world, however from time to time when I reboot my modem and router I get a different IP Address. Is there any other way to access it, or should I change configuration everytime this happens?
You would need to tell the router to reserve an IP for the RPI. “DHCP reservation”
example: https://www.youtube.com/watch?v=2pS0Pz0EcLA
Hi Miguel, sorry but I think I was not clear enough, I am talking about the IP provided by my ISP, if there is a modem reboot my ISP sometimes provide a different value for IP.
Is there any easy way to work on that not having to change it on owncloud configuration everytime?
Hi Miguel
Hi Luiz
First: thanks for this great tutorial, Miguel! I just wanted to second Luiz’ question – I wondered how to do this, too. Setting up a dynamic DNS solution at afraid.org is rather simple, but I wonder whether simply adding the dynamic dns address (myaddress.mooo.com) would be sufficient for the owncloud config file.
Cheers
Benjamin
Quick solution: yes, you can simply put domain names in the config file. There was one difficulty I had to fix: following your guide, the SSL portion of Apache did not start. I had to install / get this going separately for an HTTPS OwnCloud solution. Not to complain, just to help, Thanks, Miguel! 🙂
thanks
Hi Miguel,
Nice tutorial by the way,
If we want create multiple users, how do we process ?
create an other user in the mysql database ?
no. once you log into owncloud top right corner dropdown select add users and create one
1. under install owncloud exit the /tmp directory. cd command
2. before you configure apache web server enter sudo su and continue on.
Hey Miguel,
Great guide!!
Everything went well except im trying to do something a bit deffernt and need your HELP.
Im running octopi, which is a raspbian based print server for my 3d printer. http://www.octoprint.org
I want to also run ownCloud on this same Pi.
after rebooting the pi i can breifly get to 192.168.1.100/owncloud
But seconds later that wont load, and 192.168.1.100 takes me to octopi print server
octopi uses /etc/haproxy/haproxy.cfg
but owncloud is using /etc/apache2/sites-available/owncloud.conf
Correct?
I dont know how to resolve this conflict. im a linux n00b.
Ive been talking on the octopi forum, but they’re not familiar with owncloud.
https://discourse.octoprint.org/t/owncloud-on-octopi/2401
Hope you have time to help
Thanks
Hi sky, so to make sure you enter: http://192.168.1.100/owncloud it works fine but after few seconds the same http://192.168.1.100/owncloud takes you to octopi print server correct?
if i reboot the pi http://192.168.1.100/owncloud will load, but after a very short time after startup http://192.168.1.243/owncloud/ will return not found.
Then 192.168.1.100 (no forward slash) will go to the landing page for octopi, which seems fine for a while.
But a little while after that the formatting @ 192.168.1.100 gets broken
Ideally i would like to have
192.168.1.100/octopi
192.168.1.100 /owncloud
is going to return not foun becaused these are 2 different IP addresses “http://192.168.1.100/owncloud will load, but after a very short time after startup http://192.168.1.243/owncloud/ will return not found.”
The OctoPi forum gave me this link which has haproxy & apache configuration examples, but its WAYY beyond my understanding. I suspect you will know what it means
https://discourse.octoprint.org/t/reverse-proxy-configuration-examples/1107
Not sure if you received my other reply so will type again.
SHORTLY after rebooting pi http://192.168.1.100/owncloud loads
But then fails to load
http://192.168.1.100 (no forward slash) will then load which is octoprint page.
I suspect the haproxy thing is overriding the apache thing.
Awesome, works perfectly – thx Miguel 🙂
Hey Miguel
Excellent tutorial, but I must admit it took me a couple of attempts……. Just have to follow every step to the letter!
Thanks for my RPi server
Aaron
Hi Miguel, Thank you for this amazing tutorial. This doesn’t work when mounting external storage: sudo groupadd www-data sudo usermod -a -G www-data www-data. Pi can not find options a & G.
I tried to do what this does using “usermod -a -G www-data www-data && sudo usermod -a -G www-data www-data”. And confirmed that www-data is added to www-data using “grep ^www-data /etc/group”. But when I open my /owncloud. It complains “The requested URL was not found on this server.”
Please help!! Thanks in advance.
is 2 different commands I fixed it already
sudo groupadd www-data
sudo usermod -a -G www-data www-data