Turn Your Raspberry Pi 3 into a Personal Cloud Storage
In this post you will learn how to make a Raspberry Pi 3 an ownCloud server. This is by far the best way to have a self hosted, secure personal cloud storage that can be accessed from anywhere in the world with internet access.
This tutorial assumes that you have a fully functional Raspberry pi-2 or 3 with Raspbian installed and a 8 GB Micro SD card Minimum!. If you haven’t installed Raspbian then check out my guide on how to install Raspbian via NOOBS.
If you don’t have a Raspberry Pi I would personally recommend buying the Raspberry pi-3 kit.
In this tutorial we will be covering to following:
- Optimize your Raspberry Pi for ownCloud Installation.
- Auto install the latest version of ownCloud.
- Mount an external NTFS Hard Drive from maximum capacity storage.
- Enable SSL for Secure external access.
- Port forward for external access to your Raspberry Pi ownCloud.
Video Tutorial:
Setting up Raspberry Pi for Owncloud Server
1. Turn on the Raspberry Pi. From the terminal or SSH enter the following command:
sudo raspi-config
The following changes needs to be made in the Raspberry Pi configuration
a. Change user password
“For Security when accessing form the WAN”
b. Change locale to en_US.UTF8
Select “Internationalisation Options”
c. Overclock to Modest or Medium
by Selecting “Overclock”
d. Memory split, allocate 16M to video graphics
Select “Advanced Options” –> “Memory Split”
Once done Select Finish and reboot.
2. Update the Raspberry Pi and its packages:
sudo apt-get update
sudo apt-get upgrade
Install ownCloud 9 on Raspberry Pi
1. Visit ownCloud.org
2. Click “Download” button on the top right corner of the page and under “Download ownCloud” click on the Download button.

3. In the “Get Started” section, click on the “Packages For auto updates” tab. The one with the penguin icon on it.
4. Then click on “Continue” button at the bottom corner.

5. You’ll get Install Package screen. Here you’ll get the necessary commands to install ownCloud. They are not in order. Execute each command in the order. I placed them in proper order so you can copy and paste it from there if you want.
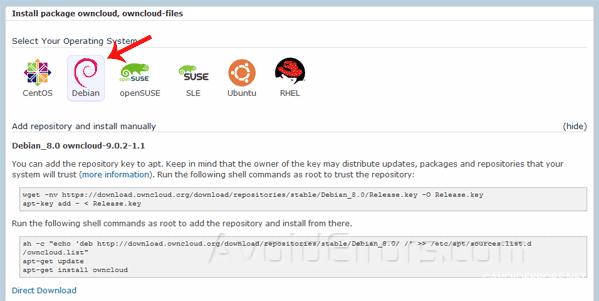
6. Copy and paste each commands into Terminal. Hit the “Enter” key on the keyboard after each command:
sudo su
sh -c "echo 'deb http://download.owncloud.org/download/repositories/stable/Debian_8.0/ /' >> /etc/apt/sources.list.d/owncloud.list"
wget -nv https://download.owncloud.org/download/repositories/stable/Debian_8.0/Release.key -O Release.key
apt-key add - < Release.key
apt-get update
apt-get install owncloud
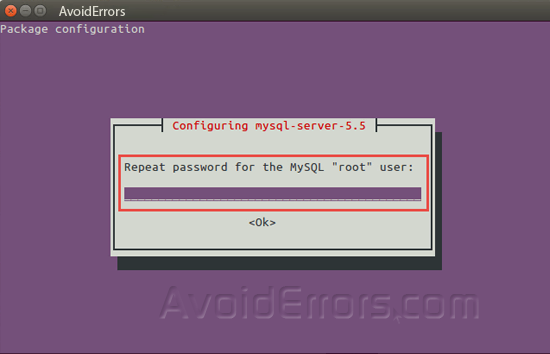
7. During the install process, mySQL will require to create a “root” (admin) password. Enter a password and confirm re-typing the password on the subsequent screen:

Mount and Set up an External Drive
These instructions are for mounting an NTFS formatted hard drive for maximum capacity storage, and allowing ownCloud to store files onto it.
1. For an NTFS drive we will need to install a NTFS package by entering the following:
sudo apt-get install ntfs-3g
2. Create a directory we can mount the drive to:
sudo mkdir /media/ownclouddrive
3. Create and add the www-data user to the www-data group:
sudo groupadd www-data
sudo usermod -a -G www-data www-data
4. Make the user www-data owner of the mounted drive and make its permissions read, write and execute:
sudo chown -R www-data:www-data /media/ownclouddrive
sudo chmod -R 775 /media/ownclouddrive
5. Now we need to get the gid, uid and the uuid as we will need to use them so the pi will remember it even if we plug it into a different USB port. Enter the following command for the gid:
id -g www-data
6. Now to get the uid enter the following command:
id -u www-data
7. We need to get the UUID of the attached external hard drive so the Pi can remember this drive even if you plug it into a different USB port.
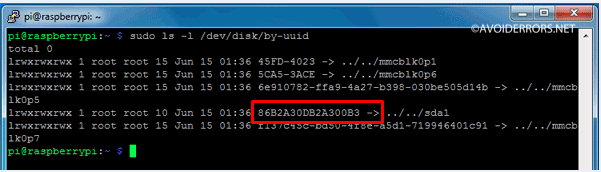
ls -l /dev/disk/by-uuid
8. Then copy the light blue letters and numbers of the sda1 entry usually located on the bottom. It should look something like (numbers&letters -> ../../sda1). See picture below:
Auto mount the external drive and then check if it is accessible at /media/ownclouddrive:
9. Add your drive into the fstab file so it’ll boot with the proper permissions.
sudo nano /etc/fstab
10. Add the following line to the bottom of the file, updating the UUID with the values you got from the above step 5. (It should all be a single line)
UUID=xxxxxxxxx /media/ownclouddrive auto nofail,uid=33,gid=33,umask=0027,dmask=0027,noatime 0 0

11. Reboot the Raspberry Pi:
sudo reboot
12. Now the drives should automatically be mounted. If mounted we’re all good to go. To check it enter:
sudo ls /media/ownclouddrive

If there are files inside the drive you should be able to see them here. If it’s an empty drive you might not see anything so don’t be surprise if nothing shows up.
If you want to absolutely positive that the drive is properly mounted, unplug the drive from the RPI plug it onto a PC since it’s NTFS it should be easily detected by the PC, open it, create an .txt file name it test, then eject it and plug it back to the RPI and re-run the command:
sudo ls /media/ownclouddrive
The .txt file you created should be there.
Enable SSL for Secure External Access
This process only applies if you are planning on connecting to the Raspberry PI ownCloud from the WAN (outside the network) using mobile devices or tablet. Enable and configure SSL on Owncloud 9 in Raspberry PI ownCloud.
1. Open the terminal and run the following command:
sudo a2enmod ssl
2. Create a new directory for the self signed certificate:
sudo mkdir /etc/apache2/ssl
3. Create the self signed certificate and the server key that protects it, and placing both of them into the new directory:
sudo openssl req -x509 -nodes -days 365 -newkey rsa:2048 -keyout /etc/apache2/ssl/owncloud.key -out /etc/apache2/ssl/owncloud.crt
Note: The above certificate is valid for 365 days. We have mentioned validity days in the command.
4. Now we need to setup the certificate:
sudo nano /etc/apache2/sites-available/default-ssl.conf
5. The lines that need changing are the following:
ServerName RPI IP :443
SSLEngine on
SSLCertificateFile /etc/apache2/ssl/owncloud.crt
SSLCertificateKeyFile /etc/apache2/ssl/owncloud.key

6. Activate the new virtual host
sudo a2ensite default-ssl
7. Restart apache
sudo service apache2 restart
Port Forward for External Access
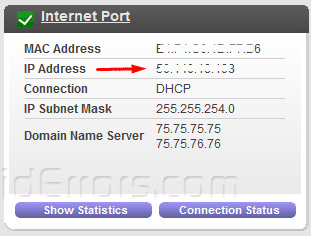
Log into your router and get the WAN IP address:
Now we need to add the WAN IP to your trusted IP list and not to be overwritten by ownCloud. To do this open the Owncloud config file, enter:
sudo nano /var/www/owncloud/config/config.php
Here add the WAN IP (External IP address) you just got from the router to the trusted domains array. Your new entry should look something like this:
1 => 'xxx.xxx.xxx.xxx',
X are just placeholders. Replace the X’s with the WAN IP Address.
Now update the URL of the overwrite.cli.url line with your WAN IP Address. It should look something like this:
'overwrite.cli.url' => 'https://xxx.xxx.xxx.xxx/owncloud',
Here is an example of the completed config.txt file.
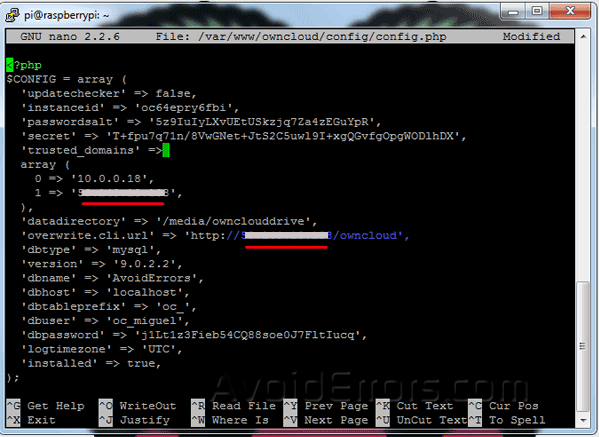
Hidden is the WAN IP. Once done save and exit.
Log back into your router and navigate to the port forward section.
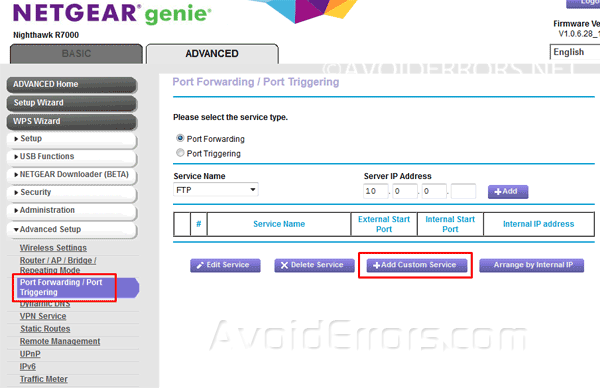
Now port forward SSL port 443 to the Raspberry PI internal IP (LAN IP) address and save settings.

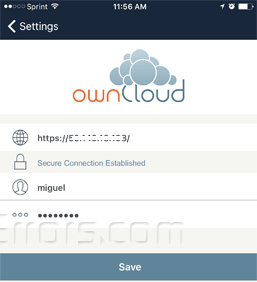
Now your RPI ownCloud is ready to be accessed externally (WAN) and from your devices just download the ownCloud App and enter: “https:// WAN IP Address” on the address bar or devices. below is an example:
Basic First Access Setup
0. Accessing Raspberry pi ownCloud From outside the network: open your browser and enter the WAN IP address. i.e. “https://50.0.0.18/owncloud” you’ll be directed to your ownCloud storage server.
1. Accessing Raspberry pi ownCloud From inside the network: open your browser and enter the Raspberry IP address provided, in my case is “https://10.0.0.18/owncloud” you’ll be directed to your ownCloud storage server.
2. Because we installed SSL for more security you might get a certificate error, simply add the certificate to your exception list to proceed.
3. You should be presented with a simple setup screen, Here enter a username and password to create an admin account.
4. Click on Storage & database dropdown and enter your external hard drive: /media/ownclouddrive (Skip this if you didn’t setup an external drive).
5. Click Finish setup.


Your tutorial is excellent. I followed it, and everything is working. I can even connect from outside my network. I have a small request. Could you add a section on how to connect to a NAS device to store the data?
Thanks, yes but that would take time but sure ill add the section.
Question about (Port Forward for External Access)
When I open the file “sudo nano /var/www/owncloud/config/config.php” All I get is
false,
‘instanceid’ => ‘oculc2j3n20o’,
);
I am missing half the content of the file
What do you think I should do????
weird because it has worked for most of my readers.
I had the same issue. After I logged in to my ownCloud with “http://IPADDRESS/owncloud, additional fields appeared in the “config.php” file.
Help…Getting stuck at OVERWRITE CLI coomand….Erro says file not found the config file is set up like the tutorial 1 => ip adderss with quotes and comma
go back to the config.php and make sure you entered the proper information.
Hello,
I have followed the steps without problem until section “Port Forward for External Access” where I am stuck: there is no “config.php” file in the directory /var/www/owncloud/config/, but only a file “config.sample.php” and another one “disable-updatechecker.config.php”.
What should I do?
/var/www/owncloud/config/config.php
As I said there was no “config.php” file in /var/www/owncloud/config/…
No the solution to my non-existing “config.php” was solved when I ran “sudo apt-get update && sudo apt-get upgrade”.
Great Demo @miguel and works ok. I have noticed nextcloud is very similar Could you please do one for installing that on a raspi from scratch or just upgrading from this version of owncloud we just done.
I’m not doing as many video tutorials as before but what I can do is do a written tutorial if that’s OK with you. Make sure to subscribe so you can be notified when the article is published.
any advice how we can upload bigger files to owncloud?
go to admin settings. the option should be there
Great video. Will this work if you static IP address from your isp?
yes
Hi Miguel…yes, please do a tutorial on NextCloud for Raspberry Pi….latest ver is 12.0…much appreciated…and yes, I did sign up for your newsletter
yes i will create one soon Im just wating on a Raspy from one of my sponsors
after installing owncloud it didn’t prompt me to MySql. What to do?
its ok just continue on and let me know if any errors comes up
For some odd reasons, I didn’t get the MySQL password setup prompt during the install; therefore, I don’t have a password for the mariadb. I tried default pi password etc and left blank and so on, no luck. Seems like I need to configure the database or reset the password via MySQL.
Let me know if you can tell me of a shortcut.
Thanks
I found a solution to that:
I figured out the way to get it working. First you have to install the mysql server by typing “sudo apt-get install mysql-server”. During the install it will ask you to set a root password, thats the same password you need to type into owncloud. After you set it, just restart apache with “sudo service apache2 restart” and finish the owncloud install. Hope this helped!