Install and Configure ManageEngine ServiceDesk Plus on Ubuntu 16.04
ManageEngine ServiceDesk Plus is an open source help desk and Enterprise IT Management Software division of ZOHO Corporation that simplifies IT management with affordable software that offers the powerful features the largest of enterprises demand.
This software provides an integrated platform where users of any organization can generate their request for IT resources. You can easily keep track on an organization’s IT requirements and assign duties more efficiently using ManageEngine ServiceDesk Plus.
ServiceDesk Plus is ITIL-ready help desk software with integrated Asset and Project Management capabilities.You can use ManageEngine ServiceDesk Plus to create projects, manage resources, track progress and integrate IT projects with requests and changes to improve your IT Service Desk quality
This tutorial will help you to learn how you can install and configure ManageEngine ServiceDesk Plus on your Linux Ubuntu 16.04 step by step.
Install ManageEngine ServiceDesk:
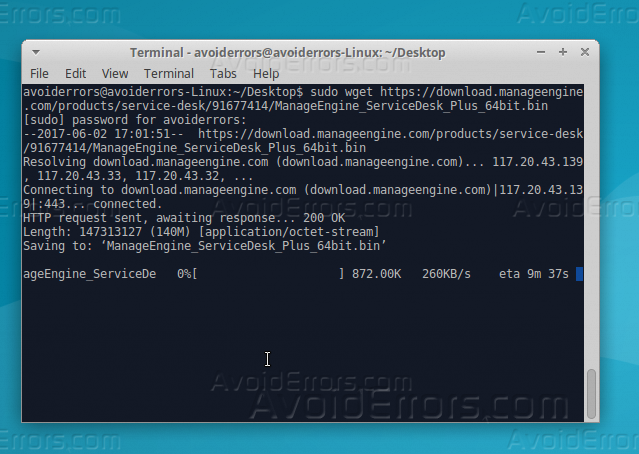
1. Download the application package for Linux using the command below.
sudo wget https://download.manageengine.com/products/service-desk/91677414/ManageEngine_ServiceDesk_Plus_64bit.bin
2. After your download is completed you have to assign the required permission to the “.Bin” file, you can do this by the below command.
sudo chmod +x ManageEngine_ServiceDesk_Plus_64bit.bin
3. Start the install progress after you set all the required permission by the below command.
sudo ./ManageEngine_ServiceDesk_Plus_64bit.bin -console

4. Choose the option 1 to accept the license agreement, but press q first.

5. Type 0 “Zero” to continue and hit Enter.

6. Select your country from the available options.

7. Enter valid email address to use it with ManegeEngine.

8. Select your edition from the available options, for me I will select “Enterprise” edition.

9. Enter 0 to continue then press 1 to confirm all the selection and start the installation.

10. Now ManageEngine is installing.


11. After the install progress is completed, use the command below to start “Service Desk Plus” server.
cd /opt/ServiceDesk/bin/sudo sh run.sh
12. MangeEngine is usually using port 8089 to work, so you need to allow its port, use the below command to allow it.
sudo ufw allow 8089/tcp

13. Now you can open Manage Engine from your web browser by entering your IP address following by ‘:8089″.

Summary
After this tutorial, you should be able to install ManageEngine Service Desk Plus and configure it with your own edition and also configure to work on the web browser.


