AvoidErrors
  • HOME
  • WINDOWS
  • APPLE
  • MS OFFICE
  • RASPBERRY PI
  • WORDPRESS
  • TECH TIPS
  • LINUX
  • VIRTUALIZATION
  • FORUM
No Result
View All Result
AvoidErrors
No Result
View All Result

Add Safe Mode To The Boot Menu – Windows 8.1

Miguel by Miguel
April 8, 2015 - Updated on July 22, 2019
in Windows
0
Share on FacebookShare on Reddit
RECOMMENDED: Transfer Windows and Installed Data to Another Hard Drive

With previous versions of Windows it was easy to access save mode, just by tapping on F8 while booting up. Now with Windows 8, Windows 10 that doesn’t seem to work for most users.

If you access the safe mode frequently you can place the save mode option on the boot menu of win 8.1 or win 10 here is how:

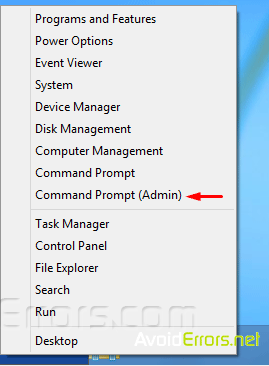
1. Open Command Prompt as admin. Right click the windows icon and click on Command Prompt ( Admin )

Add-Safe-Mode-To-Boot-Menu-6

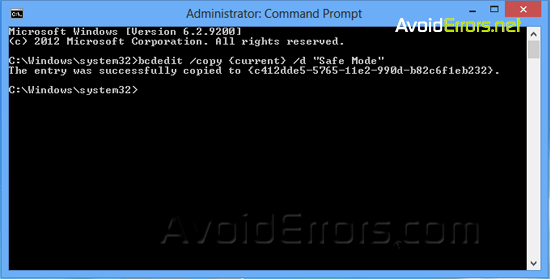
2. Enter the following command or copy and paste the command in the Command Prompt window, and press the Enter key.

bcdedit /copy {current} /d “Safe Mode”

Add-Safe-Mode-To-Boot-Menu-5

3. Once the command is executed, close the Command Prompt.

Add-Safe-Mode-To-Boot-Menu-4

4. Open Run window by pressing the Windows key + R on your keyboard. There, type msconfig and then click OK button to open System Configuration dialog.

Add-Safe-Mode-To-Boot-Menu-3

5. In the System Configuration window click on the Boot tab, Select Safe Mode from the list, check mark Safe boot under Boot options, and set the Timeout to 5 seconds. Setting 5 seconds means that boot selection menu with Safe Mode option will appear for 5 seconds before automatically booting into Windows normally.

Add-Safe-Mode-To-Boot-Menu-2

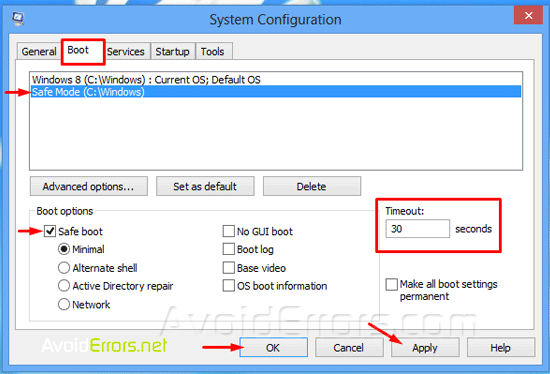
6. Click Apply button, and That is it!

Add-Safe-Mode-To-Boot-Menu-1

7. Restart your PC. Now Safe Mode option would now appear in the boot menu. If you don’t select Save Mode the boot menu will disappear automatically after 5 seconds to boot into Windows.

To remove the added Safe Mode from boot menu

1. Open the System Configuration dialog by following step 4 above.

2. Select the Boot tab, select Safe Mode from the list and then click Delete button. Make sure to select Safe Mode and no other option.

Add-Safe-Mode-To-Boot-Menu-7

Note: Deleting any other entries that is not safe mode will make your PC unbootable.

Previous Post

SSD vs. HDD: What’s the difference?

Next Post

Fix Pinnacle Studio 17 No Timeline Video Preview

Miguel

Miguel

I started this tech blog back in 2011 as a place to write down processes I took to fix my client systems and network. Now I write some tips and tricks to help others with the tech issues that one might encounter.

Related Posts

Windows

Fix .net Framework 3.5 Missing on Windows 11

by Rhousse
August 13, 2022
Clean Install Windows 11 Without USB
Windows

How to turn off Delivery Optimization on Windows 11

by Muhammad Imran Habib
August 13, 2022

Subscribe to get weekly tutorials direct to your inbox!

Windows

Fix .net Framework 3.5 Missing on Windows 11

by Rhousse
August 13, 2022
Clean Install Windows 11 Without USB
Windows

How to turn off Delivery Optimization on Windows 11

by Muhammad Imran Habib
August 13, 2022
How to Enable Dark Mode on Windows 11
Windows

How to Prevent Users from Changing Proxy Settings in Windows 11

by Muhammad Imran Habib
August 13, 2022
How to Check Laptop Battery Details in Windows 10
Windows

How to Create a New Custom Power Plan in Windows 11

by Muhammad Imran Habib
August 13, 2022
  • Disclaimer & Privacy Policy
  • FAQ
© 2022 Powered by Cloudways
No Result
View All Result
  • HOME
  • WINDOWS
  • APPLE
  • MS OFFICE
  • RASPBERRY PI
  • WORDPRESS
  • TECH TIPS
  • LINUX
  • VIRTUALIZATION
  • FORUM

© 2022 AvoidErrors Powered by Cloudways | Privacy

Welcome Back!

Login to your account below

Forgotten Password?

Retrieve your password

Please enter your username or email address to reset your password.

Log In
This website uses cookies. By continuing to use this website you are giving consent to cookies being used. Visit our Privacy and Cookie Policy.