AvoidErrors
  • HOME
  • WINDOWS
  • APPLE
  • MS OFFICE
  • RASPBERRY PI
  • WORDPRESS
  • TECH TIPS
  • LINUX
  • VIRTUALIZATION
  • FORUM
No Result
View All Result
AvoidErrors
No Result
View All Result

How to Install FreeNAS on Hypervisor ESXI

Miguel by Miguel
April 15, 2016 - Updated on April 16, 2016
in Virtualization
0
Share on FacebookShare on Reddit
RECOMMENDED: Transfer Windows and Installed Data to Another Hard Drive

FreeNAS can be run virtually inside Hypervisor ESXI and can be used in a production environment, you will need to create a virtual machine that meets the following minimum requirements:

at least 8 GB of RAM

a virtual disk at least 4 GB in size to hold the operating system

at least one more virtual disk at least 10 GB in size to be used as data storage

Let’s create a virtual machine for FreeNAS within VMware ESXi.

1. Create a new virtual machine, click File → New → Virtual Machine.
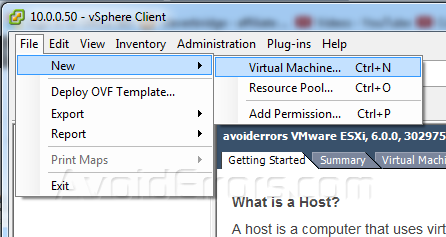
Install FreeNAS on Hypervisor ESXI

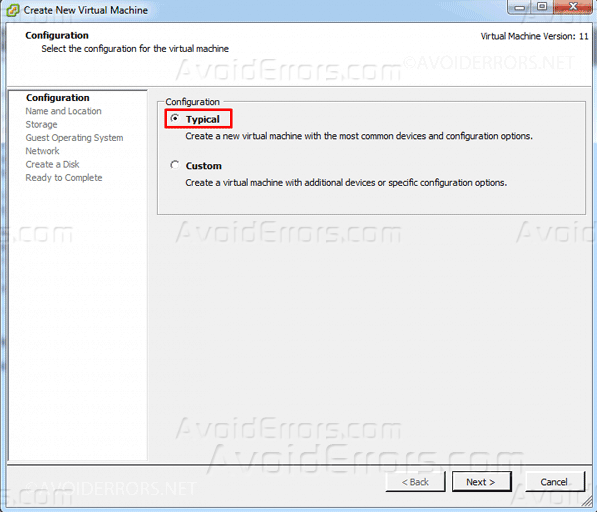
2. The New Virtual Machine wizard will launch, here select the typical configuration and Click “Next”.
Install-FreeNAS-on-Hypervisor-ESXI-6

3. Input a name for the virtual machine.

Install-FreeNAS-on-Hypervisor-ESXI-5

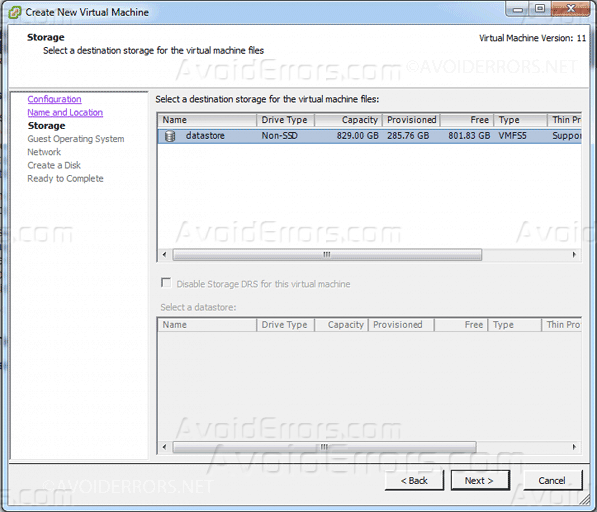
4. Select a datastore.

Install-FreeNAS-on-Hypervisor-ESXI-4

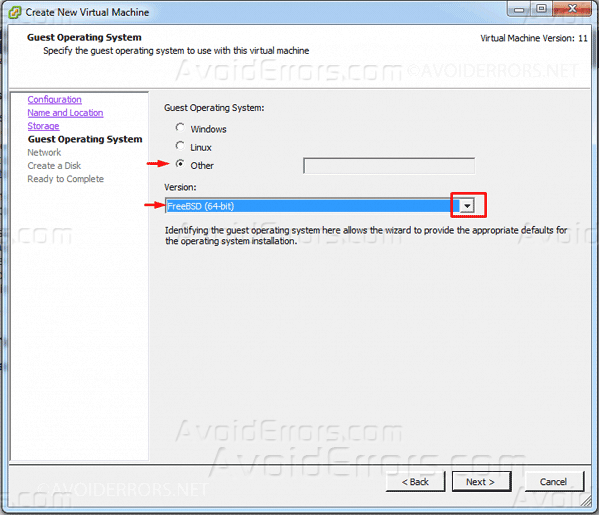
5. In the screen shown underneath, select Other guest operating system then select a FreeBSD (64bit) as version.
Install-FreeNAS-on-Hypervisor-ESXI-3

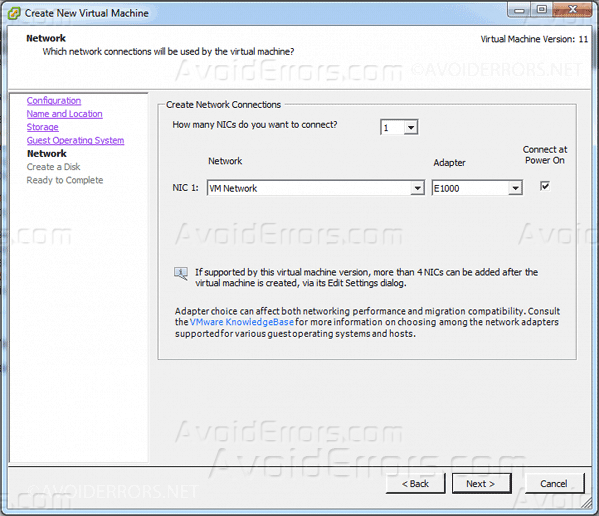
6. Select the default pre-selected network settings. Click “Next”.
Install-FreeNAS-on-Hypervisor-ESXI-2

7. Create a virtual disk of at least 6 GB to hold the FreeNAS operating system, as shown:

Install-FreeNAS-on-Hypervisor-ESXI-1

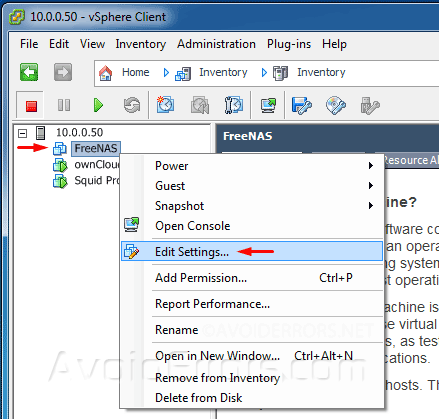
8. Click “Next” and “Finish”. Your virtual machine will be listed on the left pane. Right-click the newly created virtual machine and select “Edit Settings“.
Install-FreeNAS-on-Hypervisor-ESXI-24

9. Here Increase the “RAM Memory” to at least 8 GB, Under “CPUs”, make sure that only 1 CPU is listed.
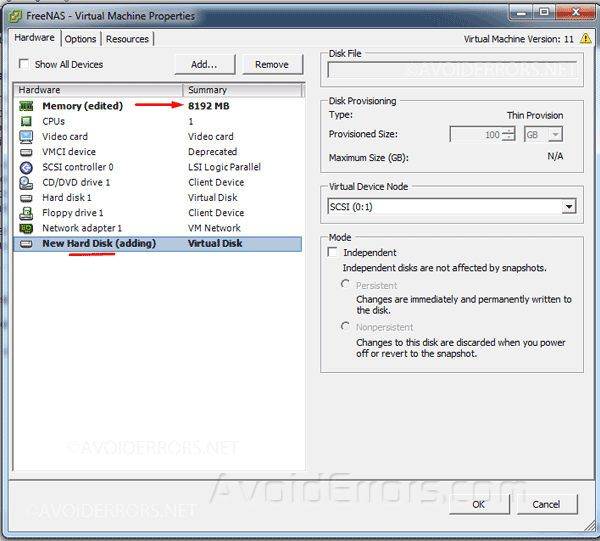
Install-FreeNAS-on-Hypervisor-ESXI-22

10. Create a storage disk, click the Add button. In the “Device Type” menu, select “Hard Disk” and click “Next”. Select “Create a new virtual disk” and click “Next”. Select the size of the disk as shown in the image underneath. Select Thin Provision. Click “Next”, then “Next” and”Finish” to create the disk. Repeat the same process to create as many storage disks needed to meet your requirements.
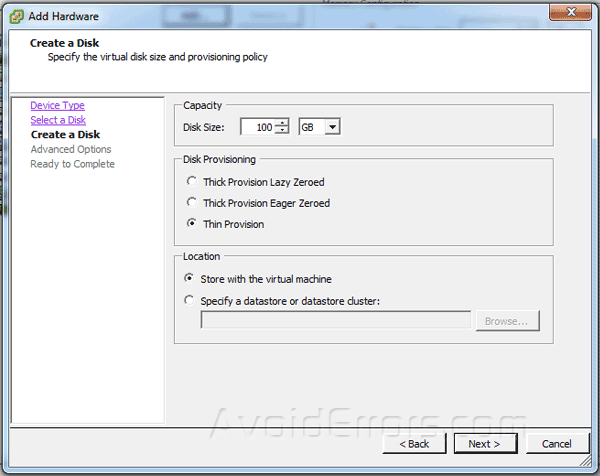
Install-FreeNAS-on-Hypervisor-ESXI-25

We have finished with the first part of creating a VM in Hypervisor ESXI for our FreeNAS. Now we need to install FreeNAS on that VM.

1. Download the FreeNAS ISO.

2. Let’s attach the FreeNAS ISO to the VM. Select the VM you just created for FreeNAS → launch VM console → power on the machine → attach the ISO.

Install-FreeNAS-on-Hypervisor-ESXI-21

3. Once the disc has been attached/connected send a Ctrl+Alt+Del to reboot and it would automatically boot from the ISO.

Install-FreeNAS-on-Hypervisor-ESXI-20

4. Hit enter to start the installation process.
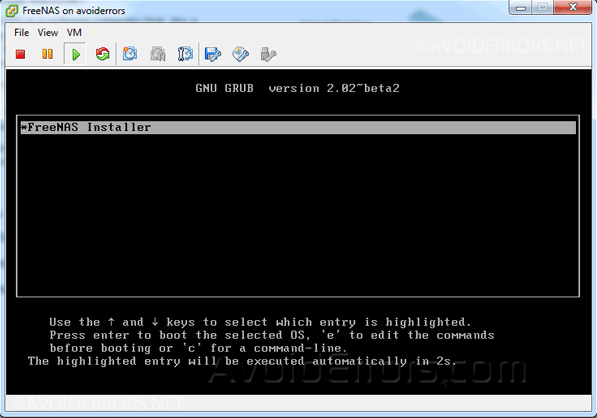
Install-FreeNAS-on-Hypervisor-ESXI-18

5. Using the arrow keys on your keyboard select Install/Upgrade and press enter.
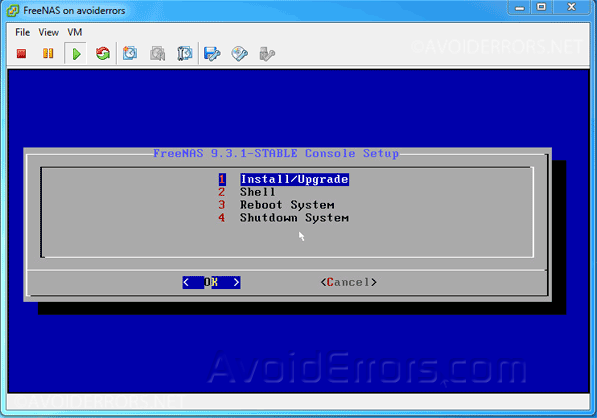
Install-FreeNAS-on-Hypervisor-ESXI-17

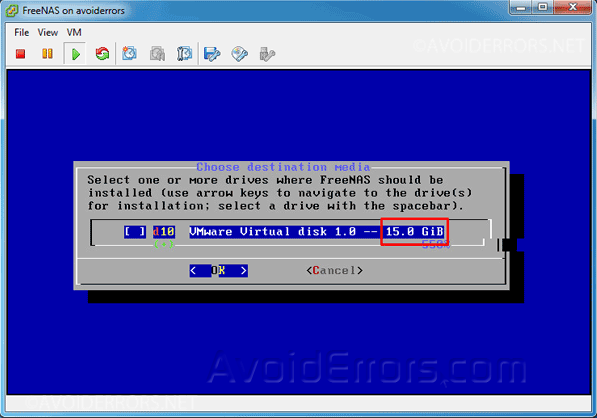
5. Here in the “destination media window” be sure to select the disk you created for your operating system by pressing the space bar and enter.
Install-FreeNAS-on-Hypervisor-ESXI-16

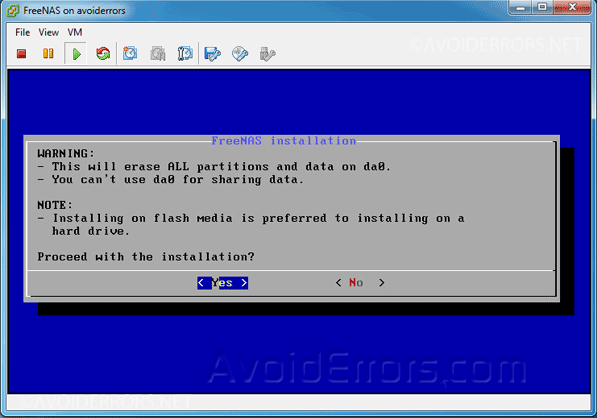
6. Read this carefully once done press enter. Because you created this virtual hard disk there is no data loss.
Install-FreeNAS-on-Hypervisor-ESXI-15

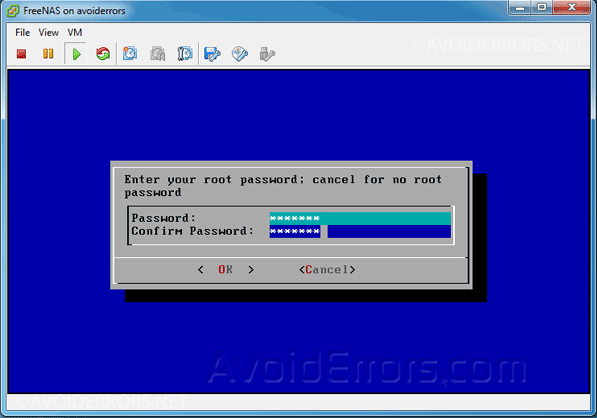
7. Create a password for the root user.
Install-FreeNAS-on-Hypervisor-ESXI-14

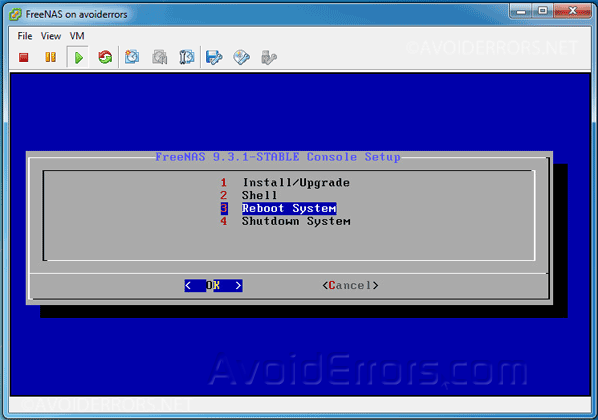
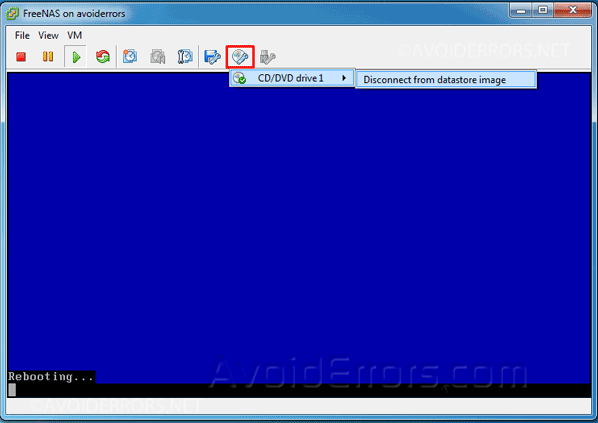
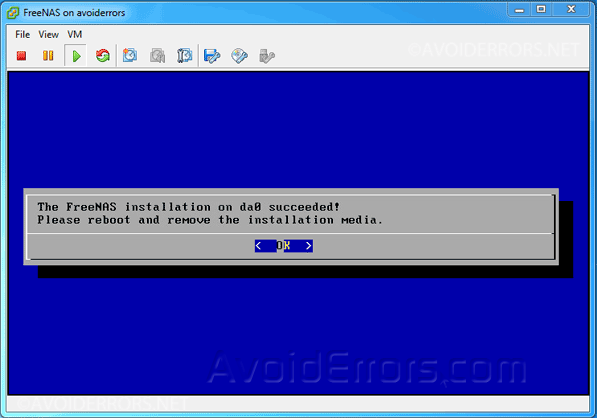
8. Once the installation has finished, reboot and remove the installation ISO.
Install-FreeNAS-on-Hypervisor-ESXI-13

Install-FreeNAS-on-Hypervisor-ESXI-12

Install-FreeNAS-on-Hypervisor-ESXI-11

9. Upon reboot you’ll be prompted with the IP address of the FreeNAS server.
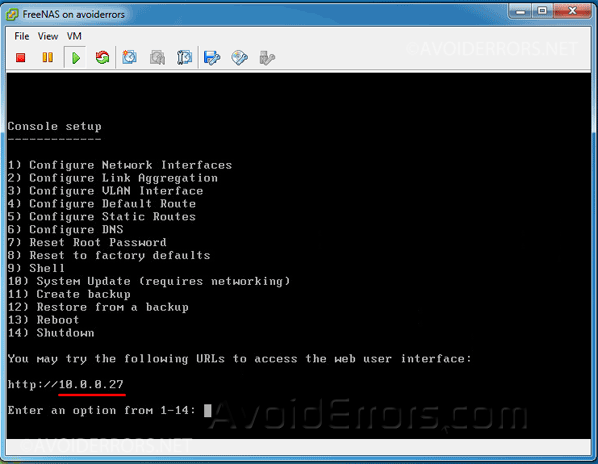
Install-FreeNAS-on-Hypervisor-ESXI-10

10. Enter that IP in the address bar to log in.
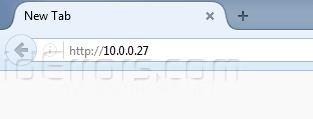
Install-FreeNAS-on-Hypervisor-ESXI-9

11. Finally, enter the username and password you created while the installation process, then you’ll be able to manually or use the wizard to configure FreeNAS.
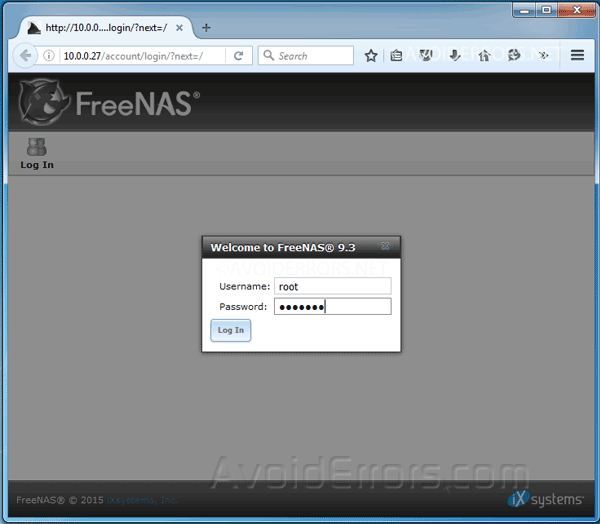
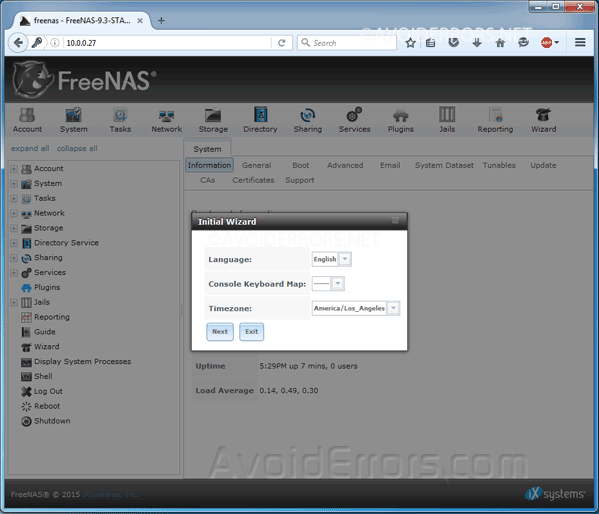
Install-FreeNAS-on-Hypervisor-ESXI-8

Install-FreeNAS-on-Hypervisor-ESXI-7

Video Tutorial:

Previous Post

How to Combine Multiple Hard Drives Into One Big Volume

Next Post

How to Install and Configure VMware ESXi 6.0

Miguel

Miguel

I started this tech blog back in 2011 as a place to write down processes I took to fix my client systems and network. Now I write some tips and tricks to help others with the tech issues that one might encounter.

Related Posts

Fix: “This PC Can’t Run Windows 11” Error – VirtualBox
Virtualization

Fix: “This PC Can’t Run Windows 11” Error – VirtualBox

by Rhousse
April 9, 2022
How to Clear Activity History In Windows 11
Apple

How to Run Windows 11 on a Mac

by Muhammad Imran Habib
November 4, 2021

Subscribe to get weekly tutorials direct to your inbox!

Windows

Fix .net Framework 3.5 Missing on Windows 11

by Rhousse
August 13, 2022
Clean Install Windows 11 Without USB
Windows

How to turn off Delivery Optimization on Windows 11

by Muhammad Imran Habib
August 13, 2022
How to Enable Dark Mode on Windows 11
Windows

How to Prevent Users from Changing Proxy Settings in Windows 11

by Muhammad Imran Habib
August 13, 2022
How to Check Laptop Battery Details in Windows 10
Windows

How to Create a New Custom Power Plan in Windows 11

by Muhammad Imran Habib
August 13, 2022
  • Disclaimer & Privacy Policy
  • FAQ
© 2022 Powered by Cloudways
No Result
View All Result
  • HOME
  • WINDOWS
  • APPLE
  • MS OFFICE
  • RASPBERRY PI
  • WORDPRESS
  • TECH TIPS
  • LINUX
  • VIRTUALIZATION
  • FORUM

© 2022 AvoidErrors Powered by Cloudways | Privacy

Welcome Back!

Login to your account below

Forgotten Password?

Retrieve your password

Please enter your username or email address to reset your password.

Log In
This website uses cookies. By continuing to use this website you are giving consent to cookies being used. Visit our Privacy and Cookie Policy.