Assign a Static IP Address to Ubuntu 20.04 LTS
In this article, I am going to show you how to Assign a static IP address on both Ubuntu Desktop 20.04 LTS and Ubuntu Server 20.04 LTS. By default Ubuntu Server 20.04 LTS uses Netplan for network configuration.
The default Netplan network configuration file on Ubuntu 20.04 LTS server is /etc/netplan/00-installer-config.yaml.
Assign Static IP to Ubuntu Server 20.04 LTS:
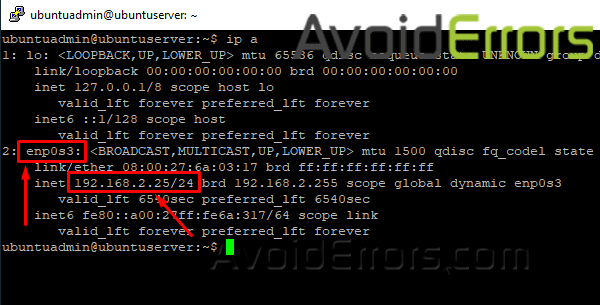
First, we would need the network interface name to configure a static IP address to find it enter the following command:
ip a

As you can see, the network interface name on my Ubuntu Server 20.04 LTS is enp0s3. The IP address 192.168.2.25 is currently assigned to the network interface enp0s3.
The network interface name will be different for you. So, make sure to replace it with yours.
Make sure that the network interface is not managed by CloudInit.
To do that, open the configuration file /etc/cloud/cloud.cfg.d/subiquity-disable-cloudinit-networking.cfg with the following command:
sudo nano /etc/cloud/cloud.cfg.d/subiquity-disable-cloudinit-networking.cfg
Make sure the configuration file contains the following line.
network: {config: disabled}

Now, open the Netplan configuration file /etc/netplan/00-installer-config.yaml with the following command:
sudo nano /etc/netplan/00-installer-config.yaml
In the default Netplan configuration (as shown in the screenshot below), the available network interfaces (enp0s3 in my case) will be assigned an IP addresses via DHCP.

To assign a static IP address to the network interface enp0s3, remove everything from the Netplan configuration file and write the following lines.
network:
  version: 2
  ethernets:
    enp0s3:
      addresses: [192.168.2.28/24]
      gateway4: 192.168.2.1
      nameservers:
        addresses: [192.168.2.1, 8.8.8.8]
NOTE: Every line in a YAML configuration file must be written correctly. Otherwise, Netplan will not accept the configuration file. You will see syntax error messages.
Here, I have used 2 spaces for each level of indentation.
Once done, save the configuration file by pressing Ctrl+ X followed by Y and <Enter>.

Make sure that the configuration file does not have any syntax errors, run the following command:
sudo netplan try
If everything is alright, you will see the following message. Press Enter to continue.
Note: If you feel you have properly written the static IP lines in Netplan configuration file and you get syntax errors, then re-edit the Netplan via SSH. it worked for me as you can see in the image above.

The new network configuration should be accepted.

Make changes permanent:
sudo netplan apply
And reboot the Server:
sudo reboot
Once your computer boots, the new network configuration should be applied as you can see in the screenshot below.

That is how you configure a static IP address on Ubuntu Server 20.04 LTS.
Assign Static IP to Ubuntu Desktop 20.04 LTS:
Ubuntu Desktop 20.04 LTS uses Network Manager for network configuration. You can configure a static IP on Ubuntu Desktop 20.04 LTS graphically (GUI) or from the command line.
In the part of the tutorial I’ll assign a static IP graphically (GUI). I will show the graphical method of assigning a static IP address on your Ubuntu Desktop 20.04 LTS.
To assign a static IP to your Ubuntu Desktop 20.04 LTS from the GUI, open the Settings app from the Application Menu.

Go to Network.
Here, you should see all the available network interfaces of your computer.
Click on the gear icon of the network interface you want to assign a static IP address.

A new window should open. In the Details tab, you’ll see your current network configuration displayed.

Now, go to the IPv4 tab. Set IPv4 Method to Manual. By default, IPv4 Method is set to Automatic (DHCP).

A new Addresses field should be displayed.

Here enter your desired IPv4 address, netmask and gateway address.

You can add multiple IP addresses to the same network interface. If you add multiple IP addresses to the same network interface, the IP addresses should have the same network gateway address.
Click on the toggle button to disable Automatic DNS. By default, DNS is set to Automatic.

Now, add DNS nameserver address. If you have multiple DNS nameserver addresses, you can separate them with commas (,).

Once done, click on Apply to save the static IP information.

The changes won’t be applied right away. You must restart the PC or the network interface for the changes to take effect.
To restart the network interface, click on the marked toggle button to turn the network interface OFF.

Now, click on the marked toggle button to turn the network interface ON again.

Now, click on the gear icon to confirm whether the new IP information is applied to the network interface.

As you can see, the new IP information is applied to the network interface. If it doesn’t apply then re-boot the computer.

That is how you set a static IP address on Ubuntu Desktop 20.04 LTS using GUI Network Manager.


