How to Backup your Raspberry PI ownCloud Personal Data
In my previous tutorial I showed you guys “How to Install ownCloud 10 on Raspberry pi 3 with Raspbian Stretch Installed” and in that same tutorial I showed how to mount an external hard drive for additional storage capacity.
In this tutorial I’ll be showing you how to back up the Raspberry PI owncloud default directory in case you didn’t mount an external drive, and or the “external hard drive” in case you mounted one for Raspberry PI ownCloud.
If you followed my tutorial then the default directory of owncloud would be “/var/www/html/owncloud“. If you mounted an external hard drive then the default directory would be “/media/ownclouddrive“.
Video Tutorial:
Note: This type backup is to backup what matters most which is your data, nothing else. I’ll be showing you how to back up to an external hard drive. So we would need to mount a hard drive to a new directory.
Mounting the Backup External Hard Drive:
Plug in the Backup external hard drive to the RPI. These instructions are for mounting an NTFS formatted hard drive and allowing the Raspberry PI ownCloud to store files onto it.
1. Having an NTFS drive we will need to install a NFTS package by entering the following:
sudo apt-get install ntfs-3g -y
2. Create a directory we can mount the external drive to:
sudo mkdir /media/owncloudbackup
3. Create and add the www-data user to the www-data group:
sudo groupadd www-data
sudo usermod -a -G www-data www-data
4. Make the user www-data owner of the mounted drive and make its permissions read, write and execute:
sudo chown -R www-data:www-data /media/owncloudbackup
sudo chmod -R 775 /media/owncloudbackup
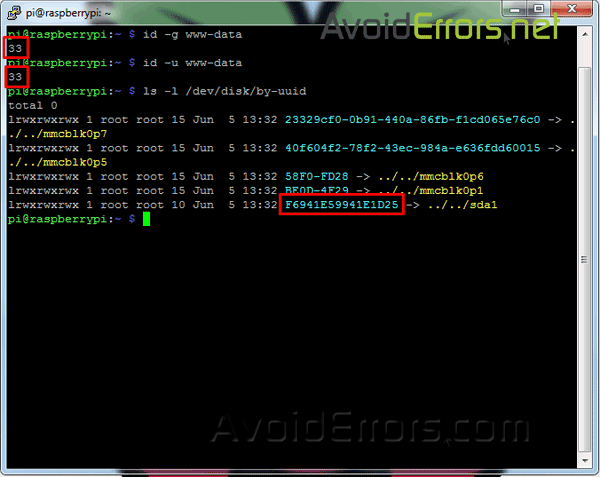
5. Now we need to get the gid, uid and the uuid as we will need to use them so the pi will remember it even if we plug it into a different USB port. Enter the following command for the gid:
id -g www-data
6. Now to get the uid enter the following command:
id -u www-data
7. Also we meed to get the UUID of the attached external hard drive so the RPI can remember this drive even if you plug it into a different USB port.
ls -l /dev/disk/by-uuid
8. Then copy the light blue letters and numbers of the sda1 entry usually located on the bottom. Should look something like (numbers&letters -> ../../sda1). See picture below:
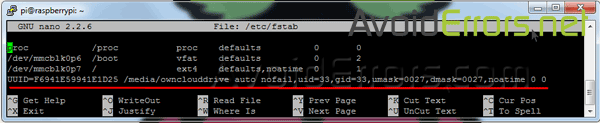
9. Now add your drive into the fstab file so it’ll boot with the proper permissions.
sudo nano /etc/fstab
10. Add the following line to the bottom of the file, updating uid, guid and the UUID with the values we got above. (It should all be a single line). Dont forget to replace the UUID number in blue to yours in stead of the one you copied from here.
UUID=F6941E59941E1D25 /media/owncloudbackup auto nofail,uid=33,gid=33,umask=0027,dmask=0027,noatime 0 0
11. Reboot the Raspberry Pi:
sudo reboot
12. Now the drive should automatically be mounted. If mounted we’re all good to go. To check it enter:
sudo ls /media/owncloudbackup

Create an Immediate ownCloud Backup:
To create a back up you need to install “rsync” this will allow us to sync the directories creating a backup of it.
sudo apt-get install rsync -y
Once installed, to create an immediate back up we would need to run a command similar to line below:
sudo rsync -av --delete /Directory1/ /Directory2/
This code above will synchronize the contents of Directory1 to Directory2, and leave no differences between the two.
To create an immediate backup of the default ownCloud directory in case you did not mount an external hard drive the command should be as follow:
sudo rsync -av --delete /var/www/html/owncloud/ /media/owncloudbackup/
This tells us that we are syncing the owncloud directory to the backup directory which is mounted to the external hard drive. In case something goes wrong you can always plug that external drive to a PC and have access to your files and photos.
To back up the external hard drive you mounted in case you followed my guide to install owncloud to the Raspberry PI, the mounted directory should be: “/media/ownclouddrive/” so the command you need to enter is:
sudo rsync -av --delete /media/ownclouddrive/ /media/owncloudbackup/
Schedule Owncloud Data Backups:
With Cron, we can have our Raspberry pi owncloud system run scheduled backups however often you would like them to run.
Let’s edit the Cron table to schedule a nightly backup:
sudo crontab -e
The first time you run this command you’ll see the following:

Here select option 2 and hit Enter to open the Crontab.

Here using the down arrow key to go all the way to the bottom and enter the following line:
0 23 * * * rsync -av --delete /Directory1/ /Directory2/
The following line will run the “rsync” every night at 11 PM. Don’t forget to replace /Directory1/ /Directory2/ with the proper Directories.
You can also run a backup every minute:
*/1 * * * * rsync -av --delete /Directory1/ /Directory2/
Conclusion:
This type backup is to backup what matters most which is your data, nothing else. If you have any question please place it in the comment section below.


