AvoidErrors
  • HOME
  • WINDOWS
  • APPLE
  • MS OFFICE
  • RASPBERRY PI
  • WORDPRESS
  • TECH TIPS
  • LINUX
  • VIRTUALIZATION
  • FORUM
No Result
View All Result
AvoidErrors
No Result
View All Result

How to Create a Windows 7 Portable USB Drive

Miguel by Miguel
August 2, 2014 - Updated on April 3, 2022
in Windows
0
Share on FacebookShare on Reddit
RECOMMENDED: Transfer Windows and Installed Data to Another Hard Drive

I’ve found a great tool to Create a Windows 7 portable USB drive or external HDD. This tutorial is about installing Windows 7 on a USB, not about Installing Windows 7 from a USB.

Requirements:

1. A Windows 7 ISO or Windows 7 disc.

2. A 15 GB USB 3.0 or larger flash drive.

3. Access to a computer with Windows Operating system installed that can boot from a USB drive.

To Create the Portable USB Drive:

If you don’t have an ISO you can create one from a Windows 7 disk or a Windows 8 Disk. [click here to learn how]

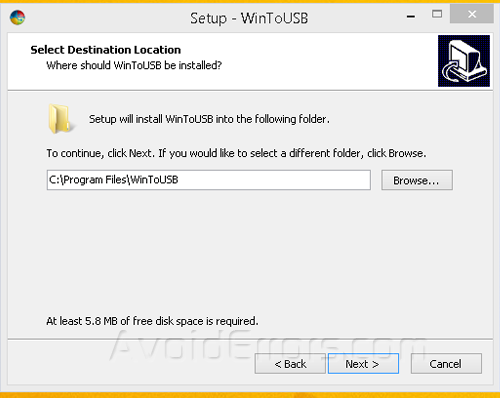
1. Download and Install WinToUSB. You’ll need to be an administrator on the computer you install WinToUSB.

How to Run a Portable Version of Windows 7 from a USB Drive 8

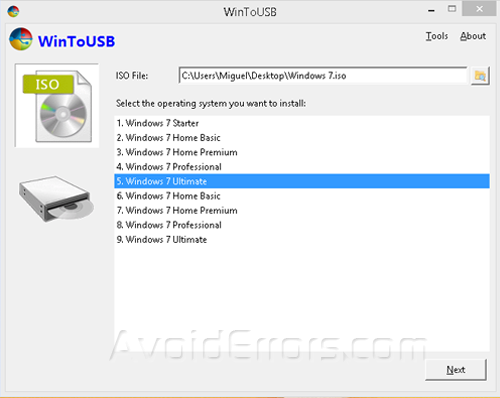
2. Run WinToUSB, you’ll be prompted to choose your ISO file or disc. Click the small folder button to browse for it, select the operating system you want to install, then click Next.

Run a Portable Version of Windows 7 from a USB Drive 5

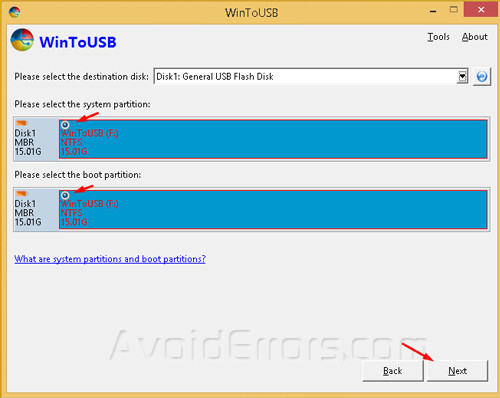
3. You’ll be asked to select your hard drive and choose the system and boot partitions. With a USB as your hard drive you should just be able to select the first partition as system and the second partition as boot, as shown.

Run a Portable Version of Windows 7 from a USB Drive 4

4. When you click next, the installation will begin. This process might take awhile depending on your computer speed.

Run a Portable Version of Windows 7 from a USB Drive 3

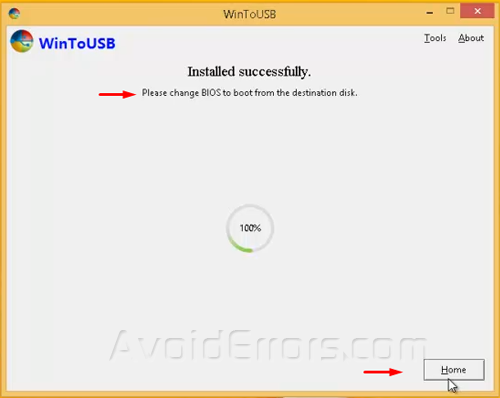
5. That’s it! It’s. Just plug in the USB onto any windows computer, restart the computer, Change the boot sequence in the BIOS and boot from the USB drive just like you would a CD.

Run a Portable Version of Windows 7 from a USB Drive

Note: The first time it starts, it’ll install the necessary drivers and take a while to boot. The installation of drivers would happen every time you plug it into a new PC.

Video Tutorial:

Previous Post

How to Dualboot Windows 8.1 with Linux Mint 17

Next Post

Fatal Error: Maximum execution time of 30 seconds exceeded

Miguel

Miguel

I started this tech blog back in 2011 as a place to write down processes I took to fix my client systems and network. Now I write some tips and tricks to help others with the tech issues that one might encounter.

Related Posts

Windows

Fix .net Framework 3.5 Missing on Windows 11

by Rhousse
August 13, 2022
Clean Install Windows 11 Without USB
Windows

How to turn off Delivery Optimization on Windows 11

by Muhammad Imran Habib
August 13, 2022

Subscribe to get weekly tutorials direct to your inbox!

Windows

Fix .net Framework 3.5 Missing on Windows 11

by Rhousse
August 13, 2022
Clean Install Windows 11 Without USB
Windows

How to turn off Delivery Optimization on Windows 11

by Muhammad Imran Habib
August 13, 2022
How to Enable Dark Mode on Windows 11
Windows

How to Prevent Users from Changing Proxy Settings in Windows 11

by Muhammad Imran Habib
August 13, 2022
How to Check Laptop Battery Details in Windows 10
Windows

How to Create a New Custom Power Plan in Windows 11

by Muhammad Imran Habib
August 13, 2022
  • Disclaimer & Privacy Policy
  • FAQ
© 2022 Powered by Cloudways
No Result
View All Result
  • HOME
  • WINDOWS
  • APPLE
  • MS OFFICE
  • RASPBERRY PI
  • WORDPRESS
  • TECH TIPS
  • LINUX
  • VIRTUALIZATION
  • FORUM

© 2022 AvoidErrors Powered by Cloudways | Privacy

Welcome Back!

Login to your account below

Forgotten Password?

Retrieve your password

Please enter your username or email address to reset your password.

Log In
This website uses cookies. By continuing to use this website you are giving consent to cookies being used. Visit our Privacy and Cookie Policy.