AvoidErrors
No Result
View All Result
AvoidErrors
No Result
View All Result

How to Remove File / Folder from Windows 10 Quick Access

Muhammad Imran Habib by Muhammad Imran Habib
July 21, 2019
in Tech Tips
0
2
VIEWS
Share on FacebookShare on Reddit
RECOMMENDED: Improve PC performance Migrate to Solid State Drive (SSD)

Quick access is the option provided by the Windows 10 to easily access mostly used files or folders in your system. You don’t need to navigate to folder and sub-folders to open the file or folder if the file/folder is available in Quick access in Windows 10. Sometimes, the privacy issue arises due to the availability of personal files or folders in Quick access.

This article will explain how we can remove file/folders from Quick Access in Windows 10.

Open File Explorer from the Taskbar. You can also open the File Explorer by pressing Win + E from your keyboard.

Click on the Quick Access option at the left side of the File Explorer window.

The Frequent Folders and Recent Files is now open on your desktop under Quick Access mode. To remove any folder from Quick Access, Right click on the folder and then click on Remove from Quick access in the options.

To remove a file from the Quick access, again Right click on the folder and select Remove from Quick access from the options.

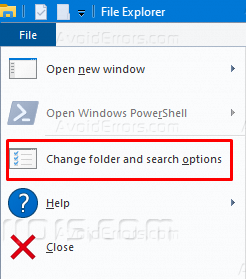
If you want to remove all files and folders available in Quick access at once, then click on the File option on the top left of the File Explorer window. Click on Change folder and search options.

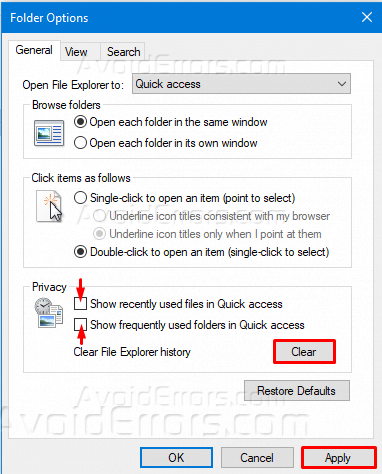
In the Folder Options window, navigate to the Privacy options and uncheck the two conditions and clear the File explorer history. Click on Apply to save your changes in the preferences.

Navigate to Quick access in File Explorer now. All the files and folders are removed from the Quick access except the pinned files or folders.

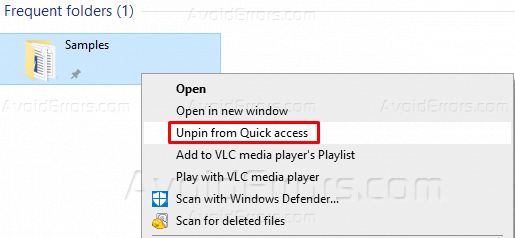
Right click on the pinned folder or file and select unpin from Quick access to remove the pinned folder or file from the Quick access.

Now your Quick access folder is empty. No files or folders will be added to Quick access until you reapply the previous settings in the privacy options of Change folder and search options.

Previous Post

How to Check Windows 10 License Type

Next Post

How to Check Laptop Battery Details in Windows 10

Muhammad Imran Habib

Muhammad Imran Habib

Imran is a technology evangelist with 8 years of experience working with some of the Industry leading companies. Imran's expertise includes On-Prem/Virtual Infrastructure deployments, IT Solutions for SMEs, End User Computing Support.

Related Posts

How to Start Group FaceTime Calls on iPhone or iPad
Tech Tips

How to Start Group FaceTime Calls on iPhone or iPad

by Ori Otokpa
May 23, 2022
Activate Voice Control on Your iPhone or iPad
Tech Tips

How to Create Voice Recordings on iPhone

by Ori Otokpa
May 17, 2022

Subscribe to get weekly tutorials direct to your inbox!

LATEST

Clean Install Windows 11 Without USB
Windows

Fix Lively Wallpaper Isn’t Working on Windows 11

by Rhousse
May 23, 2022
Fix Empty Startup Folder in Windows 11
Windows

Fix Empty Startup Folder in Windows 11

by Rhousse
May 23, 2022
How to Open Task Manager When It’s Disabled by the Administrator
Windows

How to Open Task Manager When It’s Disabled by the Administrator

by Rhousse
May 23, 2022
How to Enable Dark Mode on Windows 11
Windows

How to Manually Install Device Drivers on Windows 11

by Rhousse
May 23, 2022
  • Disclaimer & Privacy Policy
  • FAQ
© 2022 Powered by Cloudways
No Result
View All Result
  • HOME
  • WINDOWS
  • MAC OS X
  • MS OFFICE
  • RASPBERRY PI
  • WORDPRESS
  • TECH TIPS
  • LINUX
  • VIRTUALIZATION
  • FORUM

© 2022 AvoidErrors Powered by Cloudways | Privacy

Welcome Back!

Login to your account below

Forgotten Password?

Retrieve your password

Please enter your username or email address to reset your password.

Log In
This website uses cookies. By continuing to use this website you are giving consent to cookies being used. Visit our Privacy and Cookie Policy.